
Developed from: J. Paul Getty Museum
Education Staff Activity
Grade Level: Various
Time: 1-3 class periods (sub plan was for one day)
Key Artistic Concepts:
Design, drawing, play, line, relief sculpture
Lesson Objective(s):
Students will view and handle examples of modern and historical coins
and discuss similarities, differences, designs, pattern work, and details.
Students will create an original coin design incorporating shape, line,
pattern, and other imagery that depicts their interests and what is important
to them. Students will write about their coins and explain why they chose their
design elements or images.
Assessment:
“Students will be assessed on their visual analysis of a modern coin.
Students will also be assessed on group participation and discussions about
their assigned ancient coin. Finally, students will be assessed on the coin
they created, including whether they incorporated a profile of a figure and
their use of symbols.”
Students will be assessed on the following art areas: use of play, line,
shape, arrangement, drawing, design complexity, individual artistic expression
(completion overall). Technique and neatness.

Key artwork/artist/artifact: Images of
traditional and contemporary coin designs and examples. Getty Museum Coin
Photographs. Coins “In pocket”, Ms. Kanak’s coin collection. Students’ coins.
Featured Getty Artworks
Coin by Unknown Artist
Owl on a Storage Jar by Unknown Artist
Head of Augustus by Unknown Artist
Detailed Instructional Plan:
DAY 1: Students should be reminded of classroom
expectations.
Lesson objective(s) for the day: Students will
view examples of historical and modern day coins and currency. Students can
also bring in coins from home or their own collections. Students will draw a T
chart and describe the front and back sides of their coins using the chart.
What images do you see? What symbolic images? Words? Numbers? What patterns?
How can we tell the coin is old? New? Why are certain people/places/things
included in coin designs?
Required Knowledge, Skills, and Dispositions:
Knowledge: (cognitive): Design, play, interest inventory
Skills: (psychomotor) writing, sketching
Instructional Strategies/Activities:
1. Handling and/or viewing art samples
2. Activity 1: viewing and handling coins
3. Activity 2: create T
charts to compare and contrast coin designs
4. Activity 3: Look at
designs of certain coins on the overhead projector….
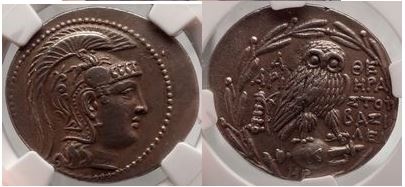
“Owl on a Storage Jar by Unknown Artist
•
Display an image of the coin depicting an owl on a jar on
the back. Ask each group that examined the coin to report their observations to
the class. Inform students that this coin shows a goddess on the front. Ask
students the following questions:
•
Based on what she is wearing, which goddess is she? (She
has a helmet, showing that she is Athena, the goddess of war.)
•
What symbols did you notice? (There is an owl, since
Athena is also the goddess of wisdom. There is a wreath, a symbol of victory.
There is also a jar, a symbol of olive oil, the most important commodity of the
city of Athens. Olive oil was transported in these jars.)
•
What letters did you notice? (Inform students that the
Greek letters for "Athe” stand for the city of Athens. Written below them
is the name "Ammodio," an Athenian magistrate in 182–181 B.C.)


Head of Augustus by Unknown Artist
•
Display an image of the coin depicting a bust of Augustus
on the front. Ask each group that examined the coin to report their observations
to the class. Ask students the following questions:
·
How would you describe this figure?
·
What is he wearing, and what does it symbolize? (He is
wearing a wreath, a symbol of victory.)
·
Inform students that this is Augustus, the first emperor
of the Roman Empire, the mightiest in the ancient world. Ask students whether
they think the coin is reflective of the power of Rome.
·
What is on the back of the coin? (A statue of
Augustus.) Why would he want a statue of himself on the back? What does
this say about him?
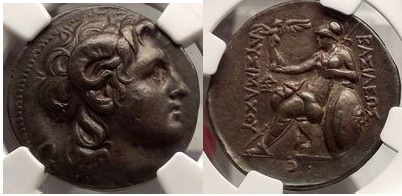
Coin by Unknown Artist
•
Display an image of the coin depicting Alexander the
Great on the front. Ask each group that examined the coin to report their
observations to the class. Inform students that the coin depicts the general
Alexander the Great (Greek, 356–323 B.C.) on the front and the goddess Athena
on the back. The coin was issued by one of Alexander’s successors, a general
named Lysimachos (Greek, c. 360–281 B.C.), who ruled Thrace, in northern
Greece, after Alexander’s death. Ask students the following questions:
•
Why do you think Lysimachos would want an image of
Alexander the Great on the coin? (Alexander was one of the greatest and most
admired generals in history, and it would have been important to have his name
associated with the reign of Lysimachos.)
•
Why do you think Lysimachos would want an image of the
goddess Athena on the back? (Athena was the goddess of wisdom and warfare.
In this image, she is shown seated, with a spear resting on her shoulder and a
figure of Nike, the goddess of victory, in her hand.) “
WHAT IS SIMILAR ABOUT ALL THREE COINS???
HOW DO THESE COINS COMPARE TO MODERN DAY
CURRENCY???
5. Activity 5: Fill
out interest inventory to inspire coin designs. Need drawings for front and
back sides of coin. BRAINSTORMING. Discuss with neighbor for ideas. (See
interest inventory sheet...)

DAY 2: Students should be reminded of classroom
expectations.
Lesson objective(s) for the day: Students will use their interest
inventories to brainstorm, sketch, and draw designs for the back and front
sides of their coins. Students will begin to work with their tooling foil and
adding designs from their coin drawings. Most students will probably complete
their coin designs today.
Required Knowledge, Skills, and Dispositions:
Knowledge: (cognitive) Design, play, line, relief sculpture
Skills: (psychomotor) drawing, tracing, using
a wooden stylus, working with tooling foil
Instructional Strategies/Activities:
Stating objectives
for the day – showing examples and demonstrating
1. Activity 1:
Presentation of student work and teacher’s samples.
2. Hand out tape rolls
or compasses to create circular template on tooling foil pieces. Each student
will receive two pieces of tooling foil.
3. Activity 2:
Demonstration of drawing onto tooling foil. Demonstrate safe use of wooden
stylus.
4. Activity 3: Begin
drawing onto tooling foil. Incorporate interest inventory designs and sketches
into coin layout. Make sure to create designs for both the back and front sides
of the coin! Students will cut out their coin designs and glue the front to the
back to created a two sided coin. Students will exchange coins with their
neighbor. The neighbor then has to inquire about the coin’s design and imagery
and report to the class.
5.
Supplemental Activity/Adaptation: Class-wide coin exchange. Students could
make multiple coin designs and distribute them to their classmates.

Materials
•
Images of Coin, Owl on a Storage Jar, and Head
of Augustus
•
Modern-day coins (one per student)
•
Scratch paper
•
Pencils
•
Aluminum or copper tooling foil squares (5 x 5 inches)
•
Compass
•
Wooden stylus
•
Scissors
•
Glue Dots® or masking tape
- - - - - - - -
Interest Inventory: Create Your Own Currency
☐ WHO:
Is there going to be a person on your coin? A
real person or a made-up person? Remember, legends and myths are options! Think
about who is important to you or who you would want to represent you on
currency. You can even make coins with your own face on them! Just like Caesar.
☐ WHAT:
Are you going to include any symbols? Logos?
Icons? Are they going to appear on one or both sides? Could you create patterns
that depict your interests or passions?
☐ WHERE:
Many country’s coins depict cities, landmarks,
or famous places. Try to include something from where you live (like the owl on
the coin from Athens)? Perhaps a hobby or activity your hometown is known for?
Will this coin even be representing a place.. or a person?
☐ TALK TO ME:
Will you include text or writing on your
coin? Will the letters/words be symbolic, or will they have a patriotic
meaning? Look at modern day coins and currency for examples..

- - - - - - - - - - - - - - - -
That's all for now! I had lots of success with this lesson plan and the 7th graders I was subbing for. Next time I would use actual tooling foil instead of aluminum foil, but wouldn't you know it's hard to get your hands on tooling foil in the middle of the north woods!
Ms. Kanak


