Sunday, September 6, 2015

Clay Dragons : As Self Portraits

Did you want more lesson plans? 
I have more.... Seriously, if I could get an extra day off every week I think I could crank out about 10 new or developed lessons per month....

Clay Dragons : As Self Portraits
(as developed from Emphasis Art textbook)


Students will pull head and leg forms from a ball of clay and construct a dragon. Students will form eyes, mouths, tails, wings, and textures on the surface of their clay.

Grade Level: 3-4th grade

Time: 10 class periods

Rationale:

Ms. Kanak when you pour paint down the sink...
Students will discuss whether scary or ugly things can be art. Students will describe how their dragon makes them feel, their dragon’s personality, how it interacts with friends or enemies that try to hurt it, whether it has any children, what the children are like. Students will be able to describe how their dragon’s diet and defense mechanisms relate to those the students use themselves. Students will become familiar with postmodern principles such as play, appropriation, and exploration. Students should use resource imagery to create realism if that is the desired effect.

Key Artistic Concepts:
Appropriation, play, texture, envision, exploration.

Lesson Objective(s):
Students will pull head and leg forms from a ball of clay. Students will form the features of their dragons using this technique. Students will describe similar forms in nature, such as other animals, tree branches, textures found in nature..etc.

Assessment:
Students will be assessed on the following: written explanation of process, interpretation, technical proficiency, utilization of materials, attention to detail and form, class discussion and participation.

Key artwork/artist/artifact: provided by Ms. Kanak


Detailed Instructional Plan:
DAY 1:
Lesson objective(s) for the day: Students will view and handle examples of dragon artwork, toys, statues, and gather textural information from their surrounding environment by doing crayon rubbings. Textures do not need to be recognizable to others but should be transferred well enough to translate into a later clay reproduction.
Required Knowledge, Skills, and Dispositions:
Knowledge: (cognitive) texture, variety, line, pattern, repetition.
Skills: (psychomotor) make crayon rubbings on the playground to gather textures for later use
Instructional Strategies/Activities:
1. Presentation and artifacts: 5 minutes
2. Activity 1: crayon rubbings/texture gathering (on site teacher demo)

DAY 2:
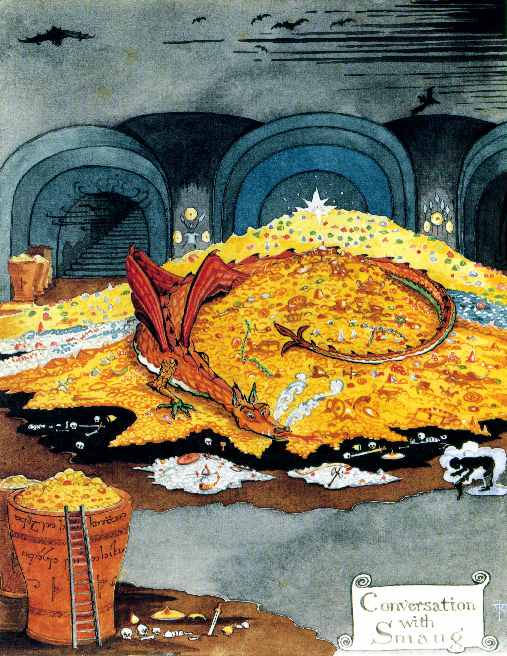
Lesson objective(s) for the day: Students will write out personality traits they possess. Students will learn about and discuss different types of dragons as cited in Google image searches, “How to Train your Dragon” series -Dragon Species (HTTYD, fantasy stories, and popular culture (The Hobbit, logos, illustrations). Students will start to draw out their dragons today on ‘big paper’.
Required Knowledge, Skills, and Dispositions:
Knowledge: (cognitive) personal knowledge, adjectives, familiarity with outside sources and media sources, dragon ‘facts’. How to combine all the elements and information into a drawing, anatomy, ‘dragon anatomy’, translation of words into images
Skills: (psychomotor) write down personality traits, draw your dragons to portray the traits you listed. Draw them in whatever position or style you want.
Instructional Strategies/Activities:
1.    Discussing dragons – what do we know already? What have we learned over time? What animals are dragons similar to?
2.    Write down personality traits you possess that your dragon will as well. Conversely, write down traits you do not want your dragon to possess. MAKE SURE YOU EXPLAIN WHY.
3.    Draw your dragon! Think about the traits you wrote down. How would you depict them in your drawing? Does your dragon have a tough personality? Maybe they should have big, thick scales to make them look bigger!
a.    Keep in mind your drawings are the ‘jumping off’ point for your dragon made from clay. Be realistic with your expectations!
DAY 3:
Lesson objective(s) for the day: Students will continue to draw their dragons on big paper today. They may add color and details to their drawings.
Required Knowledge, Skills, and Dispositions:
Knowledge: (cognitive) How to combine all the elements and information into a drawing, anatomy, ‘dragon anatomy’, translation of words into images
Skills: (psychomotor) coloring, drawing, pattern making,
Instructional Strategies/Activities:
1. Drawing/Work day
2. Teacher sample used as example to inspire students

DAY 4-9:
Lesson objective(s) for the day: Students will be introduced to their final activity. Students will begin working on their clay dragons.
Required Knowledge, Skills, and Dispositions:
Knowledge: (cognitive) students will be able to match their drawings of their dragons to the developing features in their clay dragons
Skills: (psychomotor) proper use of clay and clay tools, sculpting, pulling head, leg, tail forms from a ball of clay to construct the dragons
Instructional Strategies/Activities:
1. demonstration of pulling technique from clay ball
2. construction techniques
3. discussion of different positions for dragon sculptures, size, detail
work, etc.
4. Work time

DAY 10:
Lesson objective(s) for the day: Students will display their dragons in the classroom and describe differences in each other’s creations, identifying those that look delicate, ferocious, or strong. Each student will have time to discuss their dragon’s features and reasoning.
Required Knowledge, Skills, and Dispositions:
Knowledge: (cognitive) adjective usage, word knowledge, self-knowledge
Skills: (psychomotor)
Instructional Strategies/Activities:
1. Informal critique/discussion of work
2. Public speaking practice (presenter voice)


Art Materials List:

Big paper
Pencils
Crayons
Markers?
Clay
Clay tools
Canvas work mats
Water buckets
Brushes
Kiln
Glazes
Teacher artifacts and samples


Ms. Kanak: The Dragon Teacher Lady

Introductory Drawing Lesson? Try my Bicycle!

So it's been awhile since I updated. As per usual a whole BUNCH of things are happening in and around my life. For starters, I have begun my student teaching practicum at Wabeno Area School District in their k12 art department! You may remember posts from way back when I initially visited the art rooms there...well, now I am a part of the temporary staff :) 
It's been an awesome experience - even though I have only had one week of observation and getting to know the students and schools. I look forward to posting my lesson explorations, results, and ideas with you as I progress through my placement. 

Here's one I came up with after doing some soul-searching and looking through my own drawing syllabi and projects from my community college days. I think it would be a hugely helpful introductory lesson for both the students and the teacher. Students are able to present their work in an anonymous, collaborative way and the teacher can assess the preexisting technical abilities of the incoming students. Students will have a crash-course in Cubism as an artistic movement and style as well. 

The most important part is that it's not seen as a daunting task and everyone is doing a different part of the same project - though they do not know that until after their individual drawings are complete ;) 
Sneaky sneaky art teacher.


Try My Bicycle

Students will draw a collaborative multi-media still life using a bicycle as their primary subject. Students will briefly study works of Cubist painters.

Drawing still life images helps students learn observational techniques for drawing. Students will each draw the same bicycle from different angles, eventually putting their drawings together to form one bicycle.

Georges Braque, La Gitare

Materials:
Pencils (regular)
Sharpies (Black)
Ebony pencils
Ballpoint pens (Black)
Markers (Black)
Sketchbooks
Charcoal (black)

Process:
Ms. Kanak will roll a bicycle into the classroom (not to ride, children.)
Students will take turns, by table, coming up to look closely at the bicycle. They should make note of patterns, textures, colors, positive and negative spaces found in and around the bicycle and its parts, highlights – observing CLOSELY. Students will then return to their seats and await instruction.

The bicycle will be positioned in a place in the room where every student can see it from multiple angles. Students will be encouraged to move around the bicycle and choose a view that interests them. Each student will be drawing a DIFFERENT section or part of the bicycle.

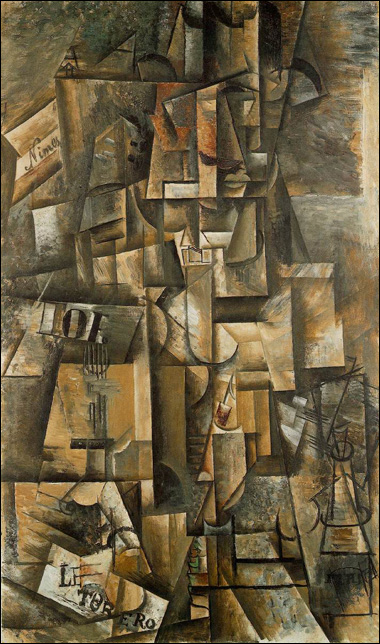
Pablo Picasso, Aficionado
Divide students by tables or some other method to distribute materials. The idea behind multiple media is to create opportunities for students to experiment and capture visual information through minimal hue structures. Students will use viewfinders to choose the composition of their chosen area to draw. Students are expected to draw a framework sketch of their chosen area to begin their final drawings.

Students will be limited to the use of their sketchbook page for size and time purposes. CAPTURING DETAILS and OBSERVATION are the main takeaways for this project. Each student should spend a minimum of 5 days on this project.

Hand out materials AFTER demonstration and samples.. Each student will produce one drawing to contribute to the bicycle mural. After all the drawings are ‘done’ Ms. Kanak will gather them up anonymously. As a class we will use the drawings like puzzle pieces to reconstruct the bicycle. We will then assess the accuracy of the drawings when they are combined. Individual drawings will be graded as assessment of skill and observational technique.
Students will have the opportunity to revisit their bicycle drawings to make them more elaborate or to re-draw/paint/sketch their images in a chosen style.

Pablo Picasso, Guitar (I love Eva)

Questions during process: What details do I see? What are the space relationships between parts of the bicycle? What patterns exist in my section of the bicycle? How can I make the drawing look “plastic” (realistic)? Is my section of the bicycle recognizable?


I will be utilizing this lesson in my drawing classes with some possible variation on the objects brought in. A more direct emulation of the artists would be to draw from instruments... I think a bicycle is a good place to start. 

More to come! I love holiday weekends :)

Ms. Kanak

Monday, August 3, 2015

Art History at the Zoo

SO I dunno what just happened but Blogger took a crap and deleted my whole post... which is oh so fun. Pardon any weird formatting things, please! I had to redo all of it >:(

In the past week I had some time to work on my teacher sample for the previous post! Very bare-bones minimalist drawings at the moment. 
Thinking of painting the final image to serve as a sample :)

heart anatomy sketch... framework

Pizza and dragon scales.. I'm weird.
This lesson is way ridiculous, but it speaks to me so loudly I have to put it down. But first, some background. As you may have realized I really love art. I love going to museums, speaking with artists to talk about their process, being in galleries... the whole thing. What I do Not love, and what many students share a frustration with is art history. It's a difficult balance, being the art teacher who is really... really not all that into the old dead masters - but there is a way through the dust and gathering z's from napping during lecture. I was forwarded this little gem a week ago and I want to share it now with you because it has strengthened my desire to finish my lesson which is in the same vein.

To begin with, I was sent this link on my Facebook page.. it's kind of the best thing ever. Bill Flowers is an artist who specializes in a rather unusual subject for his work. He calls himself "The Snake Artist" and for good reason; he does live paintings/drawings of snakes and then.. he did my favorite thing ever. 
He painted snakes into famous works from art history. I. Am. So. Happy.

The Birth of Snake Venus, after Botticelli

 If you didn't already know... I have a snake and he's kind of a huge part of my life and I hope one day he is also a huge part of my classroom. 

the sass is palpable

Flowers incorporated snakes into some of the most recognizable works of art - and some of the most clicheed and copied... like the all-too-well-known Mona Lisa. 

Mona the Snake Handler, after Da Vinci

As stated in my previous post.. humor and personality is everything to me. I got a good laugh out of these paintings, but I really saw a lot of potential for learning as well. These would be a fun way to introduce kids to the humdrum world of art history and I would love to see what they came up with. I have also seen an increase in altered paintings/images in general. One of my friends at school painted into an existing image that she found at a thrift store. I don't have a picture of it but she painted a bear with chainsaws for arms into a tranquil, bland waterfall/landscape image. Too too funny!

Snakey Night, after Van Gogh

The idea of giving the old classics a new life resounded with me in a big way. How many times have you seen Starry Night? It's all over coffee cups, posters, even umbrellas, people! I want to see some crazy things being added to the mix - I'm tired of the textbook classics, bring on the zoo animals! This lesson was also partially inspired by a project I did way - way way- back in elementary school wherein we studied American Gothic by Grant Wood and then had to alter it in some way. I made them go to Six Flags. The woman had a balloon and the rollercoaster was drawn into the background.. the man had a Six Flags hat and t shirt. I really thought that assignment was fun and I still laugh when I see American Gothic - but I know what the painting is and who the artist was! Humor is a learning tool - I love it.

Objectives:
   Discuss parody as an art form
   View the work of Brian Flowers as well as other pieces of parody art history
   Sneakily (...snakily?) study major works of art history
   Draw from observation
   Create pieces of parody art with well-rendered, studied, animal drawings incorporated into the final composition
   Utilize grid structure for transfer of images
Key Concepts:
   Parody: an imitation of the style of a particular writer, artist, or genre with deliberate exaggeration for comic effect.
   Art history is part of human culture and development
   We can make meaning through the use of humor
Essential Questions:
   How does our culture interact with art history objects/works?
   What is the effect parody has on our experience of an art work?
   How can we use humor as a tool for learning?


Art History at the Zoo
Lesson Plan

Cultural Connections: How does our culture interact with art history objects/works? We will do a google search (all very technical) for parodied art history works. We did this activity in one of my art history courses just to see what came up... uhh Paris Hilton and Obama for American Gothic? Too funny.
Visual Culture: What is the effect parody has on our experience of an art work? Could be a formal or informal discussion - depends on what we find!
Artists and Resources:
Google searches - seriously, get ready for giggles.
Reference books, observational drawing, zoo visit....(I love the zoo)

I would love to incorporate a zoo visit to this lesson! First of all.. most kids really enjoy looking at animals. Second of all... I love zoos. Or farms, or anywhere animals are found! Maybe in the school there are classroom pets or a biology class that houses classroom animals - I want to use my resources wisely. If anything else, having the kids look at encyclopedias, textbooks, library texts, or as a last resort the internet will provide just as much information for their drawing and planning. The main goal is to see animals in action, moving around, in different positions or poses, from different views - you want to explore the full range of movement and see the possibilities for placement and interaction. Students will be required to complete observational gesture drawings and sketches before their final composition is started.

Minerva and the Centaur after Botticelli

As an alternative to replacing all the humans or figures with animals, students could choose to replace one major element or part such as the cat in place of the centaur.. but if you ask me the centaur is already weird. Whatever. Here are some of the other results I found in my google search :)


Kids could have a lot of fun with replacing figures with animals - in the process they are learning about reproducing art history masterpieces, drawing animals, and composition. When I did the project as a 2nd grader we were able to trace a xerox of American Gothic and then we placed tracing paper over top to complete the image. I could provide young students with many different paintings and they could choose which one they wanted to manipulate or add to. With older students I could have them work on grid structures to reproduce the original compositions and then they could make changes.


With older students I would also likely have them focus on more complicated subjects than just animals. It would be a prime opportunity to discuss the use of trademarked or copyrighted images and characters. 


This assignment would also be a fun way to dip into the interests of my students. I would start with recognizable character parodies and masterpieces and then begin to introduce more obscure and likely older works for a jumping-off point. I love so many of the examples I found - I think the results would be pretty impressive!

Frida the hipster...

Adventure Time/ My Neighbor Totoro*

* The references would not have to be 'great masterpieces' all the time. Many students are heavily influenced by comic books, movies, animation, and anime.

The Creation of Adam - the Creator of Muppets


The Scream - Ala Homer Simpson

I think that one of these days- you know, in my spare time- I will have to come up with a sample for this lesson. It would be super fun and it would force me to delve back into my art history textbooks - they aren't all covered in dust just yet. I will leave you with this... a painting of the last supper populated by snakes by Bill Flowers. Let the laughter ensue.


Amen.

Ms. Kanak