Saturday, August 23, 2014

3D Printing: Attempt Two! Funnel Cakes and Robots

Holy man, it's already going to be time for classes again! With classes comes responsibilities for work, projects, photography, paintings.. I do not think I will ever be BORED this semester, that's for sure! I will be in my Individual Art Review class for painting and that is going to be a whole other ballgame.. but in the meantime, I have been enjoying my 'freedom' and was invited to work in the Design Lab at my university pretty much all day yesterday :) 

unpacking... it was like Christmas!
As you may (or may not) know, I was invited to present at the Michigan Art Education Association conference this year in Lansing, Michigan. My presentation will center around the educational applications of 3D printing in k-12 schools. I met with my Educational Technology professor (who got me all worked up about 3D printing in the first place!) and he had exciting news - he had a new 
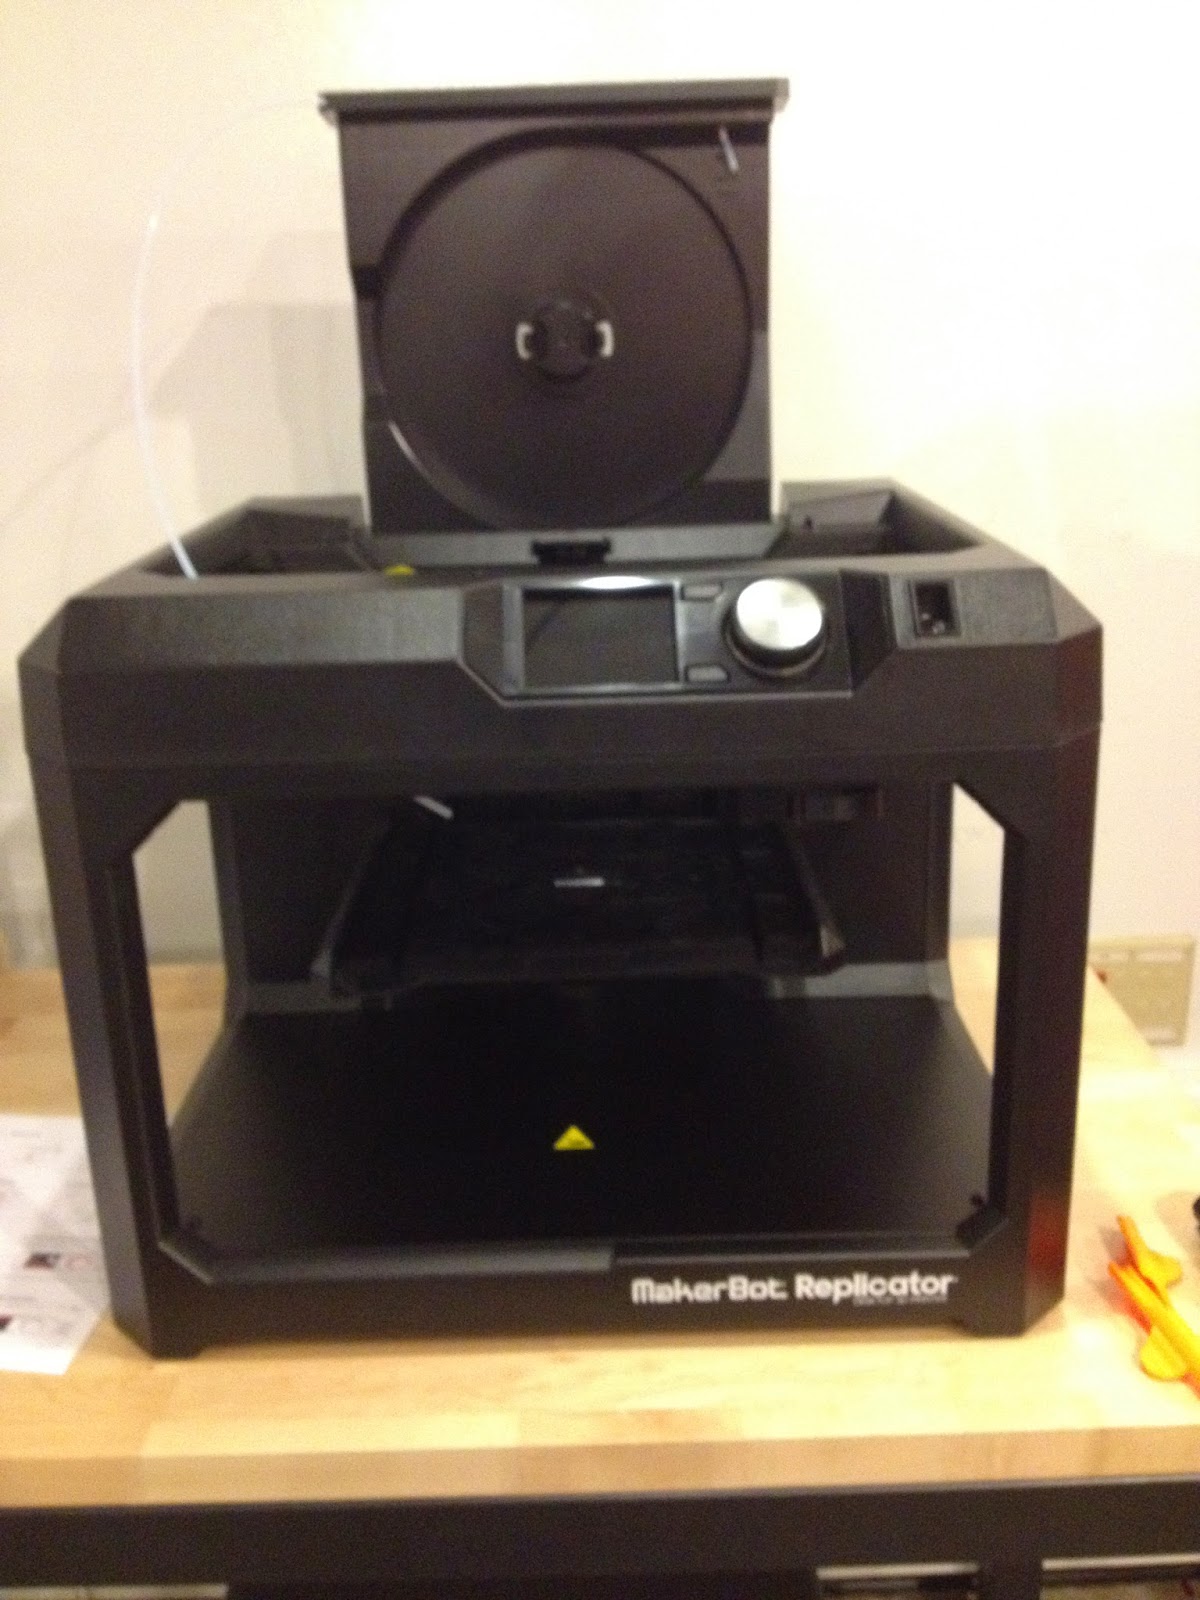
Makerbot Replicator to unpack and set up for the lab! He invited me to help him and then encouraged me to play and experiment with the printer - uuh YES. Just what I needed! It is important to me as a presenter to be actively involved in every step of the printing process so I can better understand the questions I will be asked - and the needs of teachers. That includes assembly and set up! Just like any other machine :)

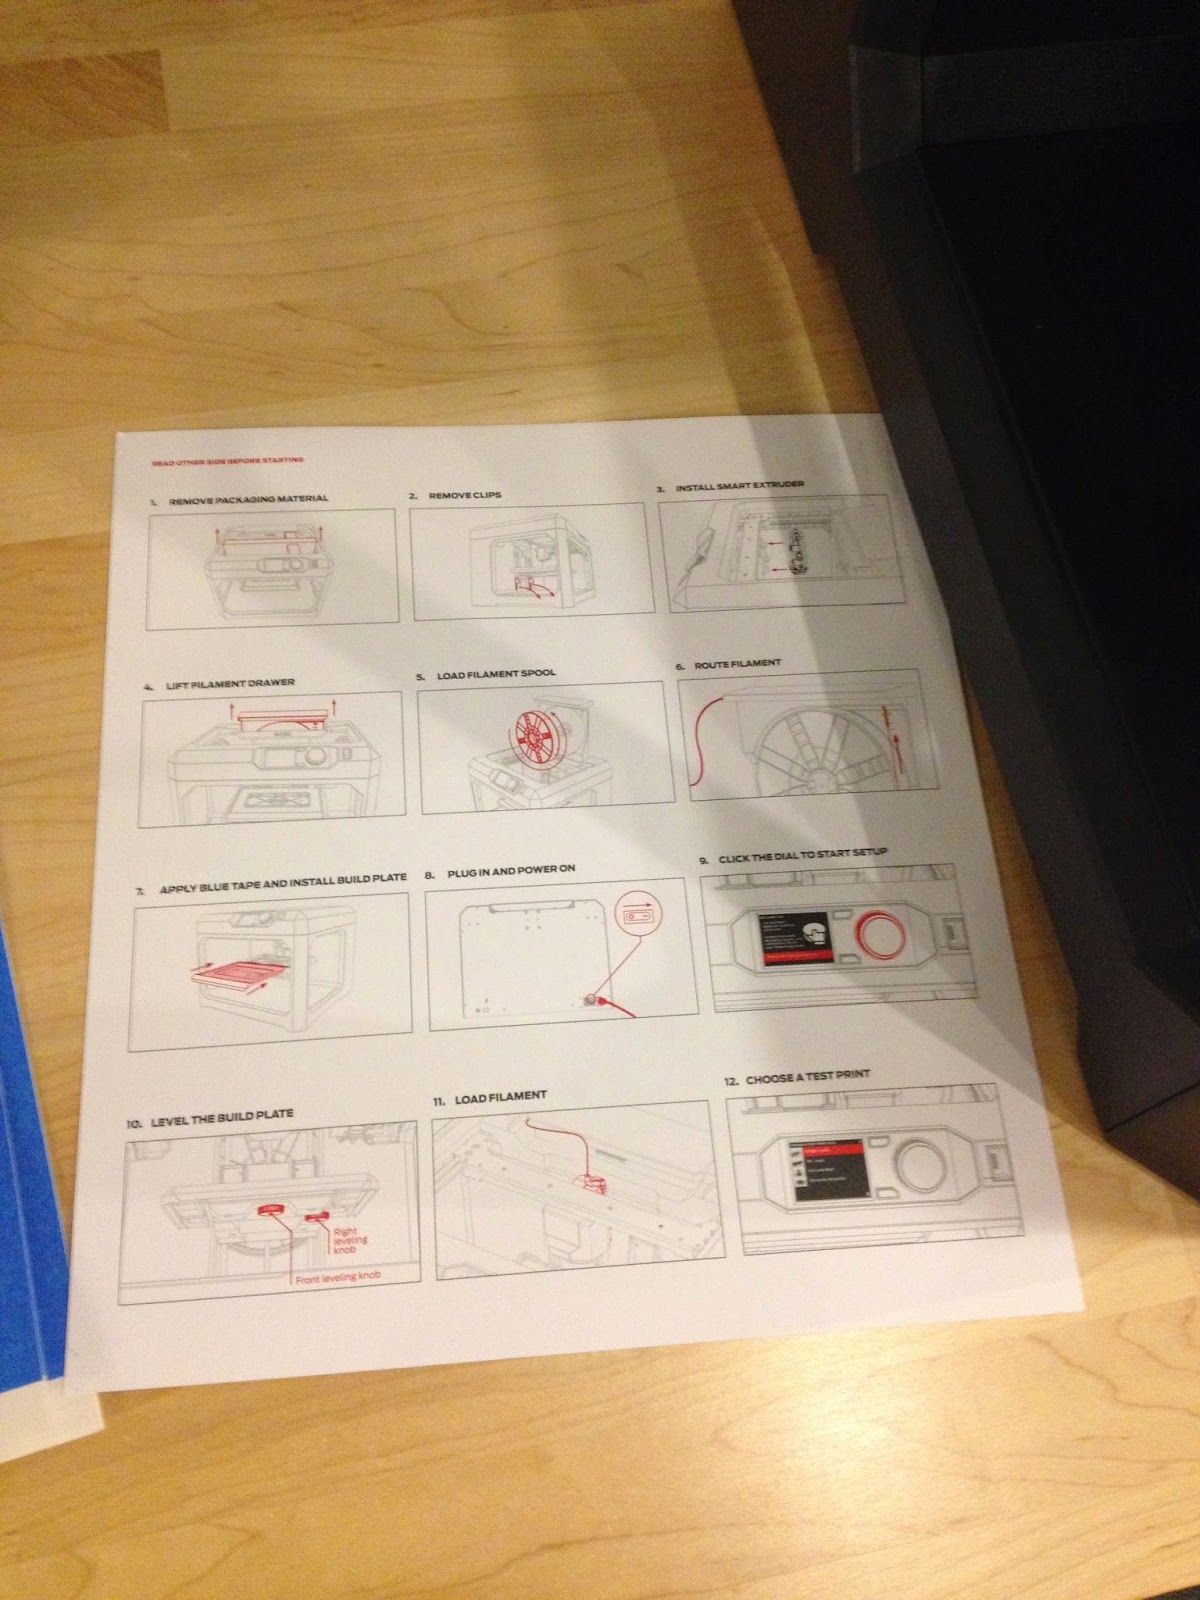
the entire set of instructions. seriously - that's it!
My presentation proposal read as follows:
"I would like to present on the potentials for learning with 3D Printing in the classroom, funding, and benefits of 3D printers in schools. I have been researching this technology for some time now. I will continue to experiment and gain more experience with 3D Printing before the conference. I have also contacted Makerbot, one of the leading manufacturers of 3D Printers, for advice, samples, and more information. I want to introduce art teachers to this cutting-edge and current technology and remove the stigma from 3D Printing in the art room."
Sound good?! I think so...  back to the printer.

One thing I noticed right away was the simplicity of Makerbot's directions! In the packaging there was one (yes, one) sheet, back and front, of directions. And to be honest only one side had any directions on it! The other side was an inventory of shipped supplies and parts. The setup was SUPER easy - it only took about ten minutes to load filament, plug everything in, attach the extruder... easy easy! One of many reasons it is an appealing technology for teachers ;) In addition to simple set up, Makerbot has an active community of users and employees that are available to answer questions or troubleshoot issues you may have with your printer. In all my experiences in schools with technology initiatives, customer service is paramount in a classroom where you have 20+ kids all doing something at the same time and you RELY on your technology to teach and to learn. Being able to easily receive help with problems removes a lot of the stigma from introducing new technologies in schools...for me anyway!

Getting ready to load filament..aka "ink"
Loading the filament, called PLA (Polylactic Acid), was as simple as snapping in to the spool provided on the back of the printer. Polylactic Acid is a biodegradable type of plastic that is used in all different areas of production such as automotive parts, textiles, electronic components and even food preservation. It is bio-plastic, but think of it as fancy corn plastic. It stinks a little bit when you are printing because of the heat applied, but it's not a strong enough odor to bother you unless your face is right next to the machine (guilty). After that you have to feed filament through a plastic tube that eventually leads to the extruder (print head). The extruder (or as they call it, the "Smart Extruder") was a bit of a puzzle.. we figured out that a screw and a series of magnets is all it takes to become attached to the printer! No hardcore assembly required.
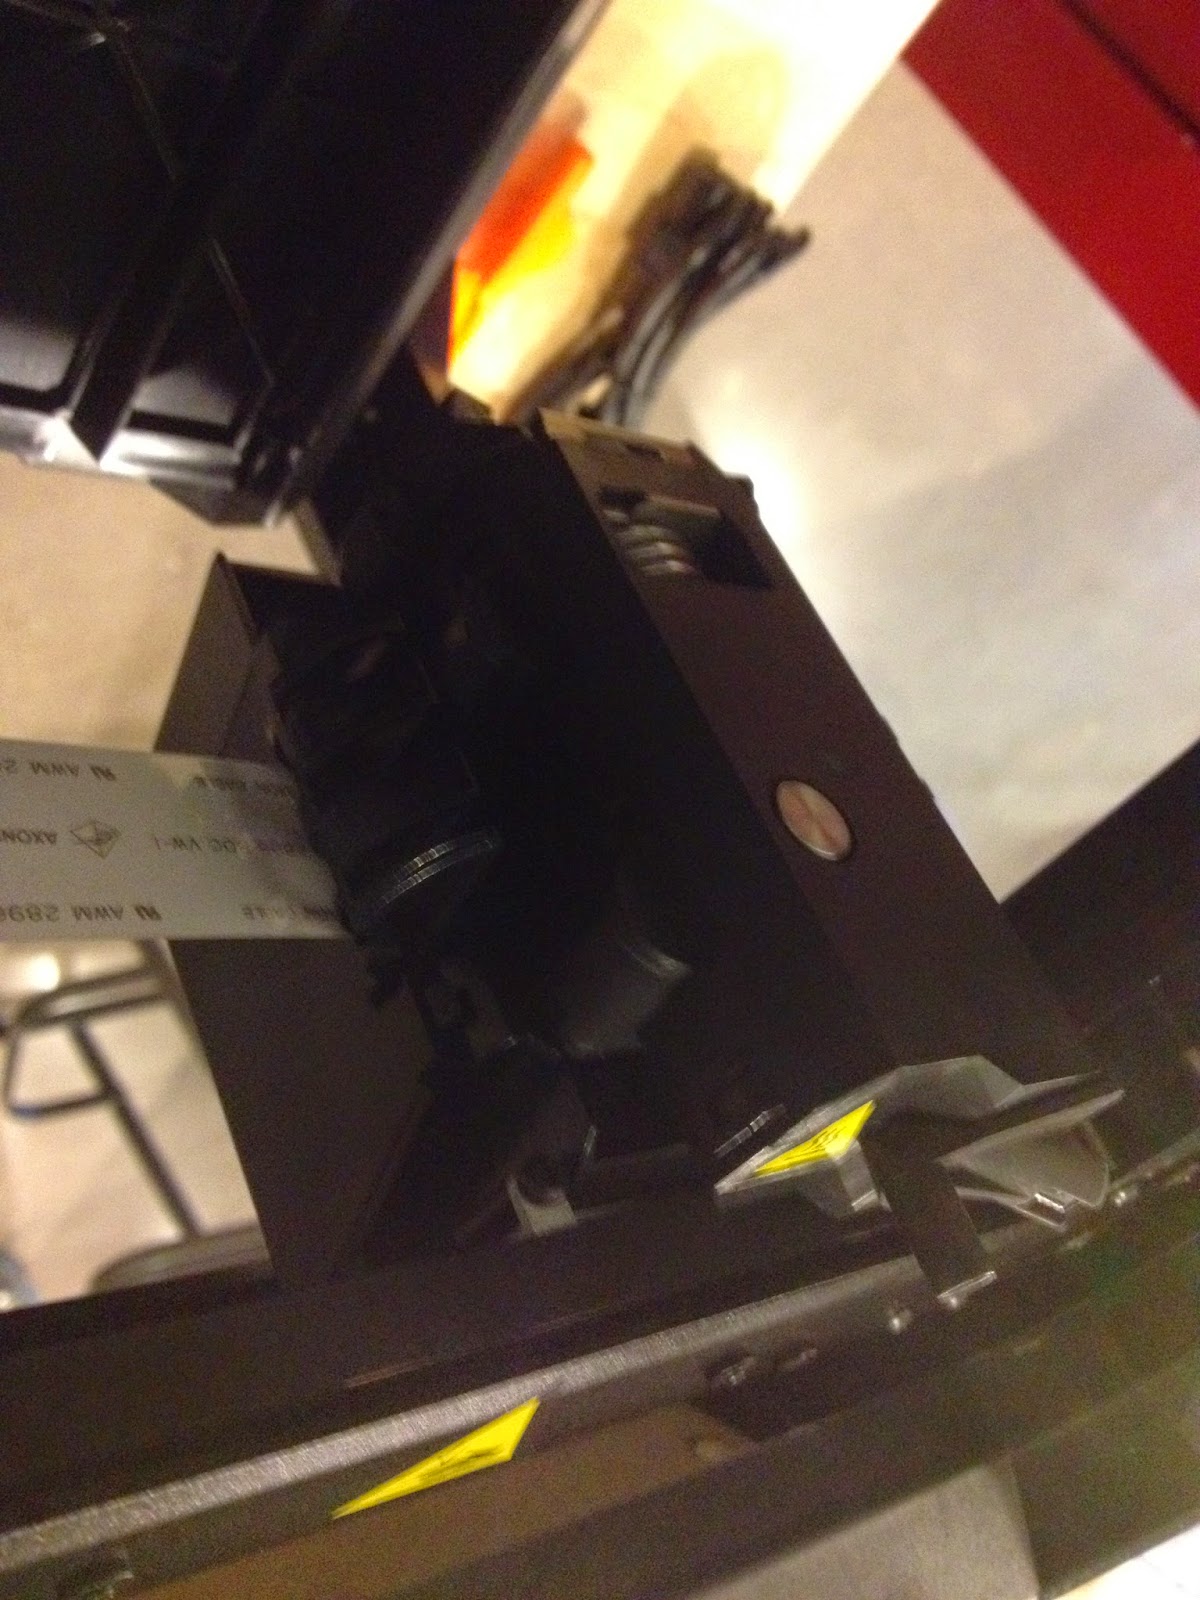
smart extruder
 The extruder is one part of the printer that communicates with the firmware (computer) and feeds plastic filament into the printer. This will be a tricky thing to explain to the teachers but.. I will try to form an analogy to regular printing, I guess. The filament is like a solid ink cartridge and it is fed into the printer head (extruder) to create prints? Yeaaaa..I'm working on it lol

almost ready! setting up the printing plate and loading...loading loading.
 One of the main issues I have read about in my research of 3D Printing is calibrating/leveling the printing plate. Makerbot has specialized sheets of blue tape which adhere to the glass print surface to prevent prints from sticking and to reduce damages from support material. Reading up on different types of printers, I discovered that Makerbot has one of the most efficient and easy methods to level the printing plate. Many DIY printers and some certain pre-assembled models have little to no guidance on how to level your print area - which leads to all sorts of problems. It would be like loading your inkjet printer with paper on a slant - no bueno. Your printing would be uneven and inconsistent which would lead to a sloppy, possibly over-inked print.
On the Makerbot, there are two knobs that you have to turn a certain way to level the print area - and the printer actually communicates with you when to start and stop! That step was the most time consuming and 'labor intensive' of them all... but then came the waiting!

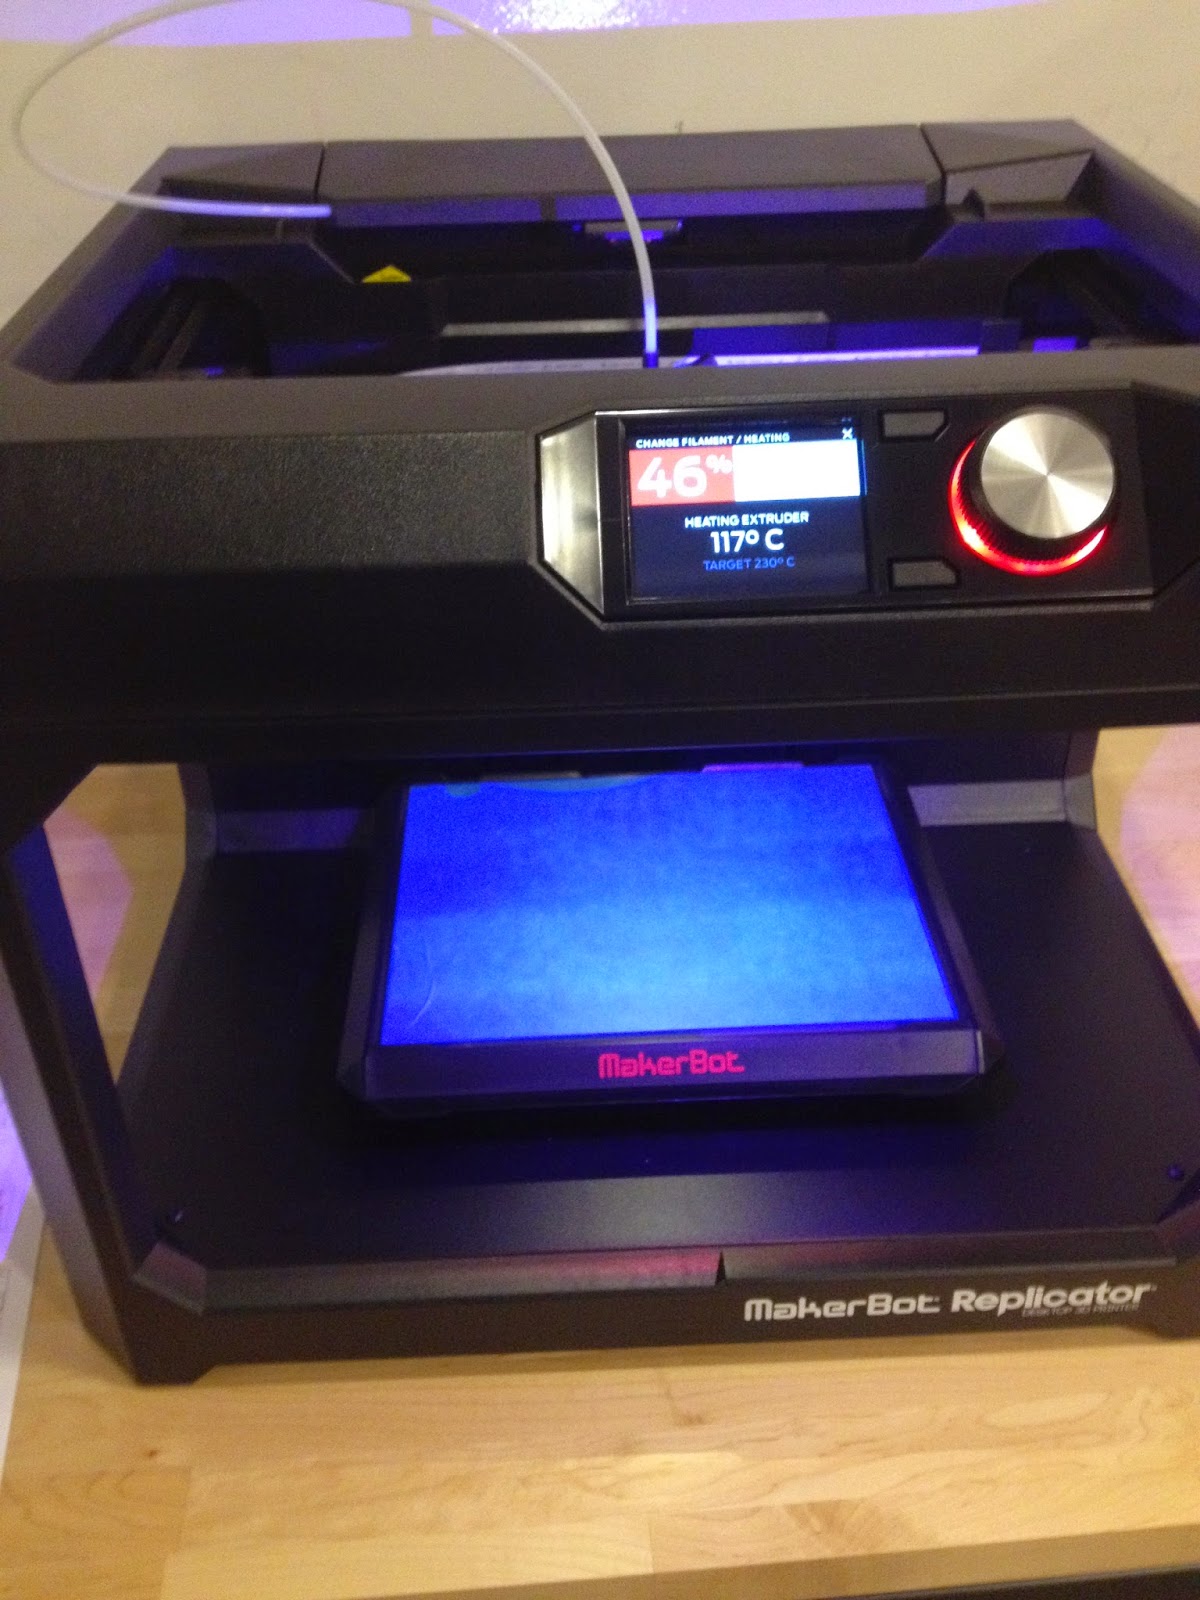
waiting for the printer to heat up... takes a life age when you just wanna play!
 3D Printers do their thing by heating up the plastic filament in the Smart Extruder. The extruder is a heating element that communicates with the printer.  Temperature inside the extruder increases gradually, allowing the filament to be heated evenly throughout and be prepared for printing. The plastic filament is pushed into the heating element, melted, and then pours out of the extruder into your computed shape or object. To use a food analogy, it looks like hot batter being poured for a funnel cake (mmmmm yes) but the funnel cake can become ANYTHING and is built up in layers. The computer tells the printer what direction to extrude filament and in what patterns/designs. So think of a double-decker or multi-story funnel cake. Think of it. Now clean yourself up because you're drooling! Okay, maybe that's just me...

Makerbot is working on creating wireless capabilities for their printers - in a busy area like the university, the networks become pretty clogged up with chatter so we used a USB cable to connect to the printer. We also used an ethernet cable to connect to the internet. You can also save objects/designs onto a drive or card and transfer them to your printer. When I downloaded the Makerbot printing software I was provided a library to start with - and Thingiverse! Thingiverse is another resource for printing - it is a huge hub for designers, artists, and 3Dprinting enthusiasts to share their projects with others. You can download the files and then the Makerbot software (or your printer's software) imports them for editing and printing.. it can be very technical designs or very simple templates. The choice is yours! In addition to downloading designs you can also outsource designs to printing companies such as Shapeways and iMaterialise. For teachers without the option to print in their classroom or school, outsourcing to printing companies is a viable option. But for me... I am going to want it in front of me haha

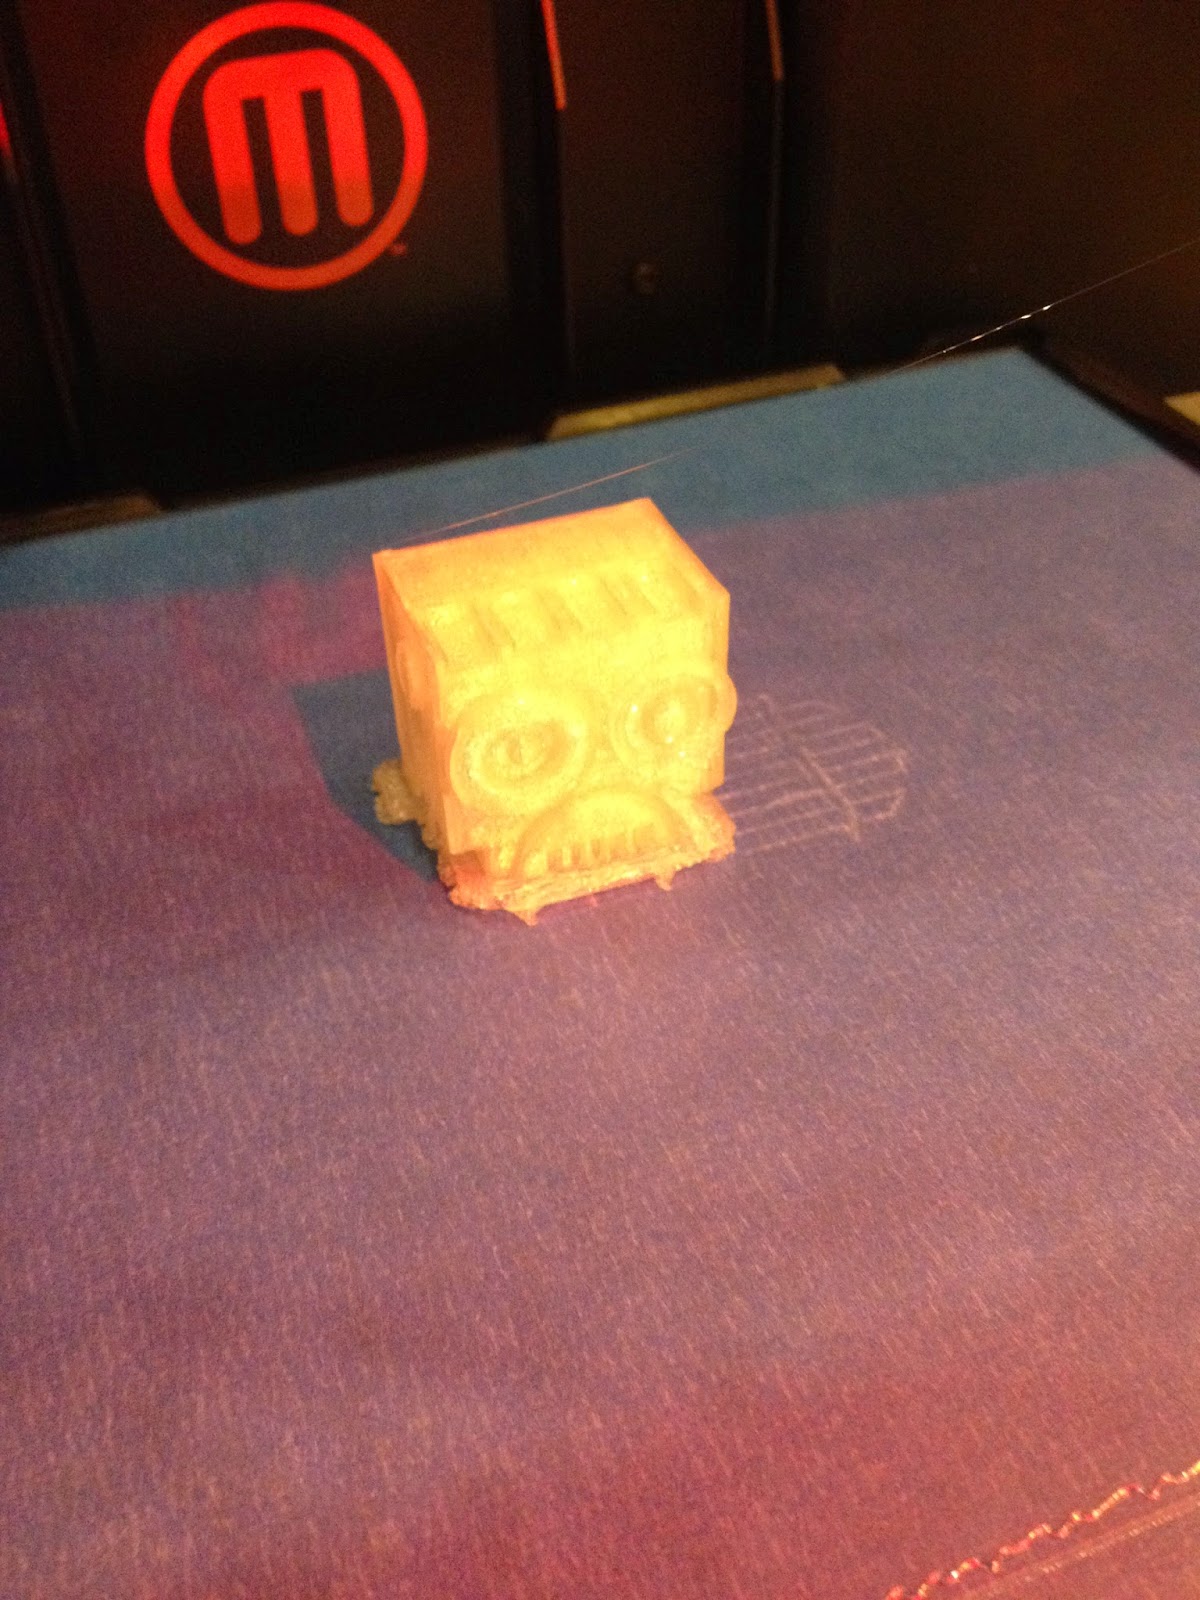
I made a robot head! More on that soon...
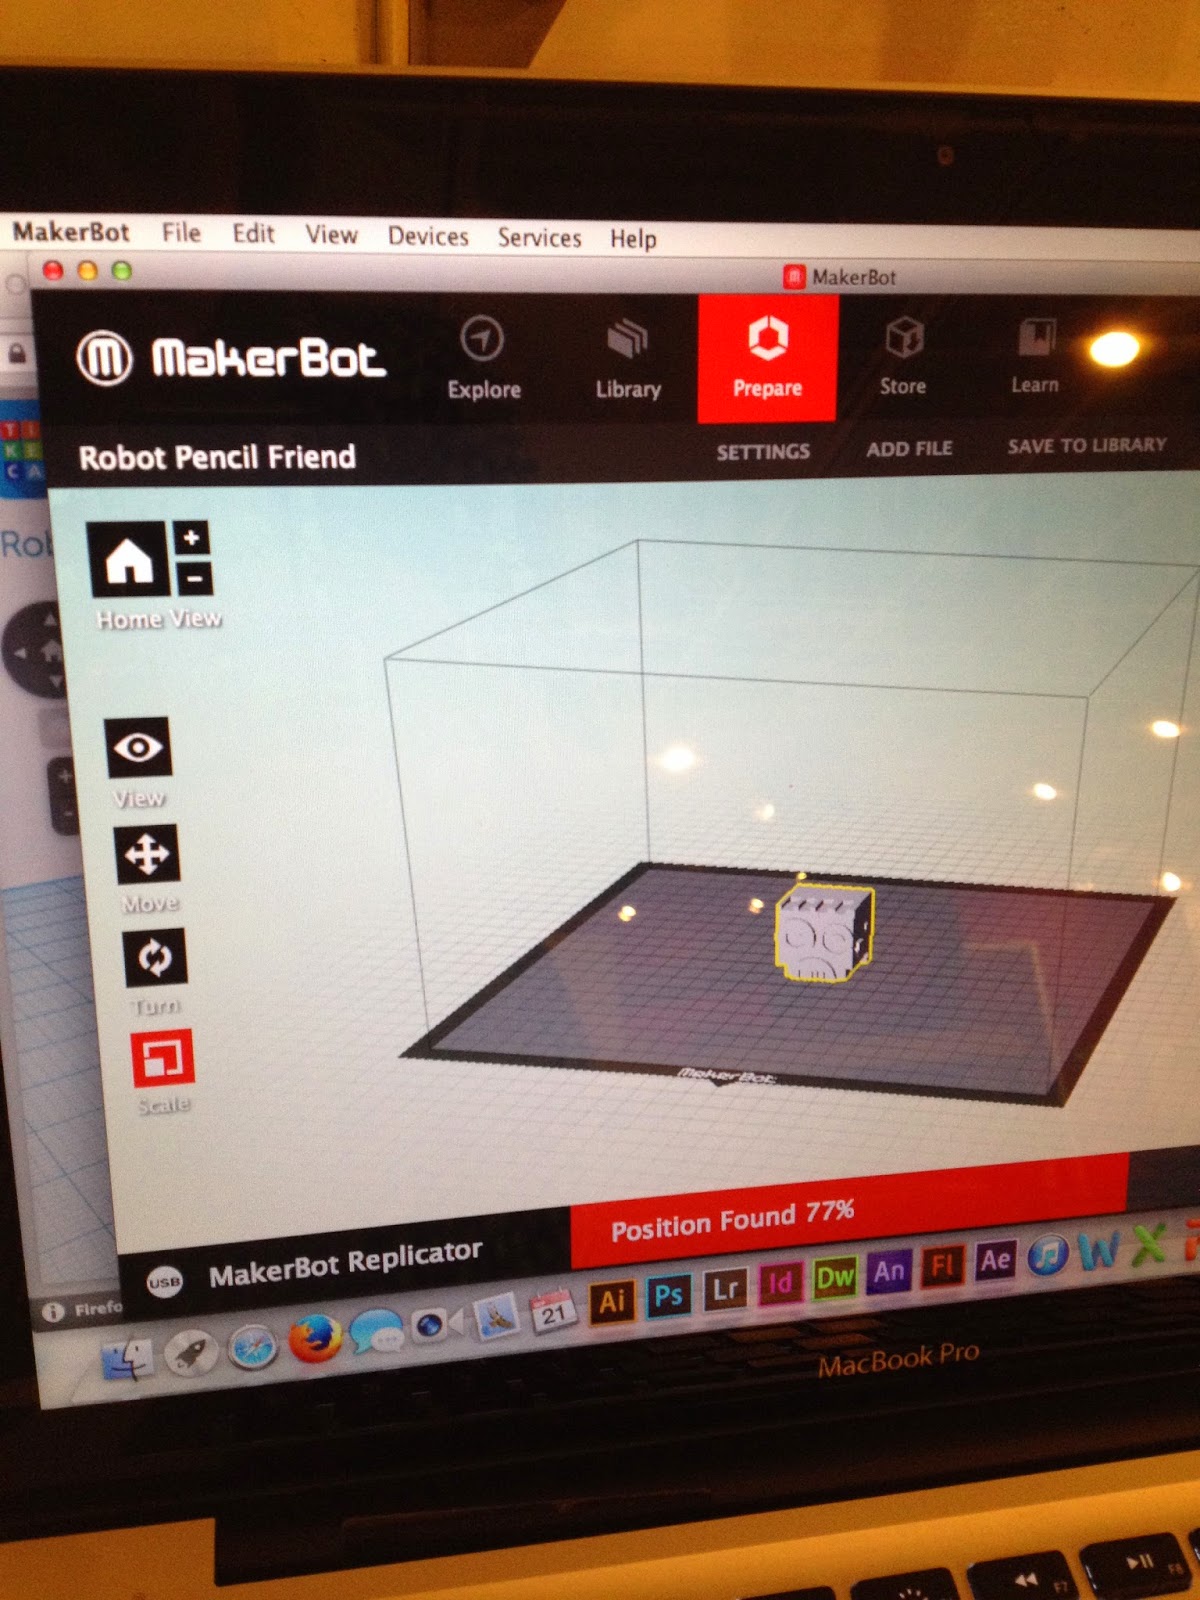
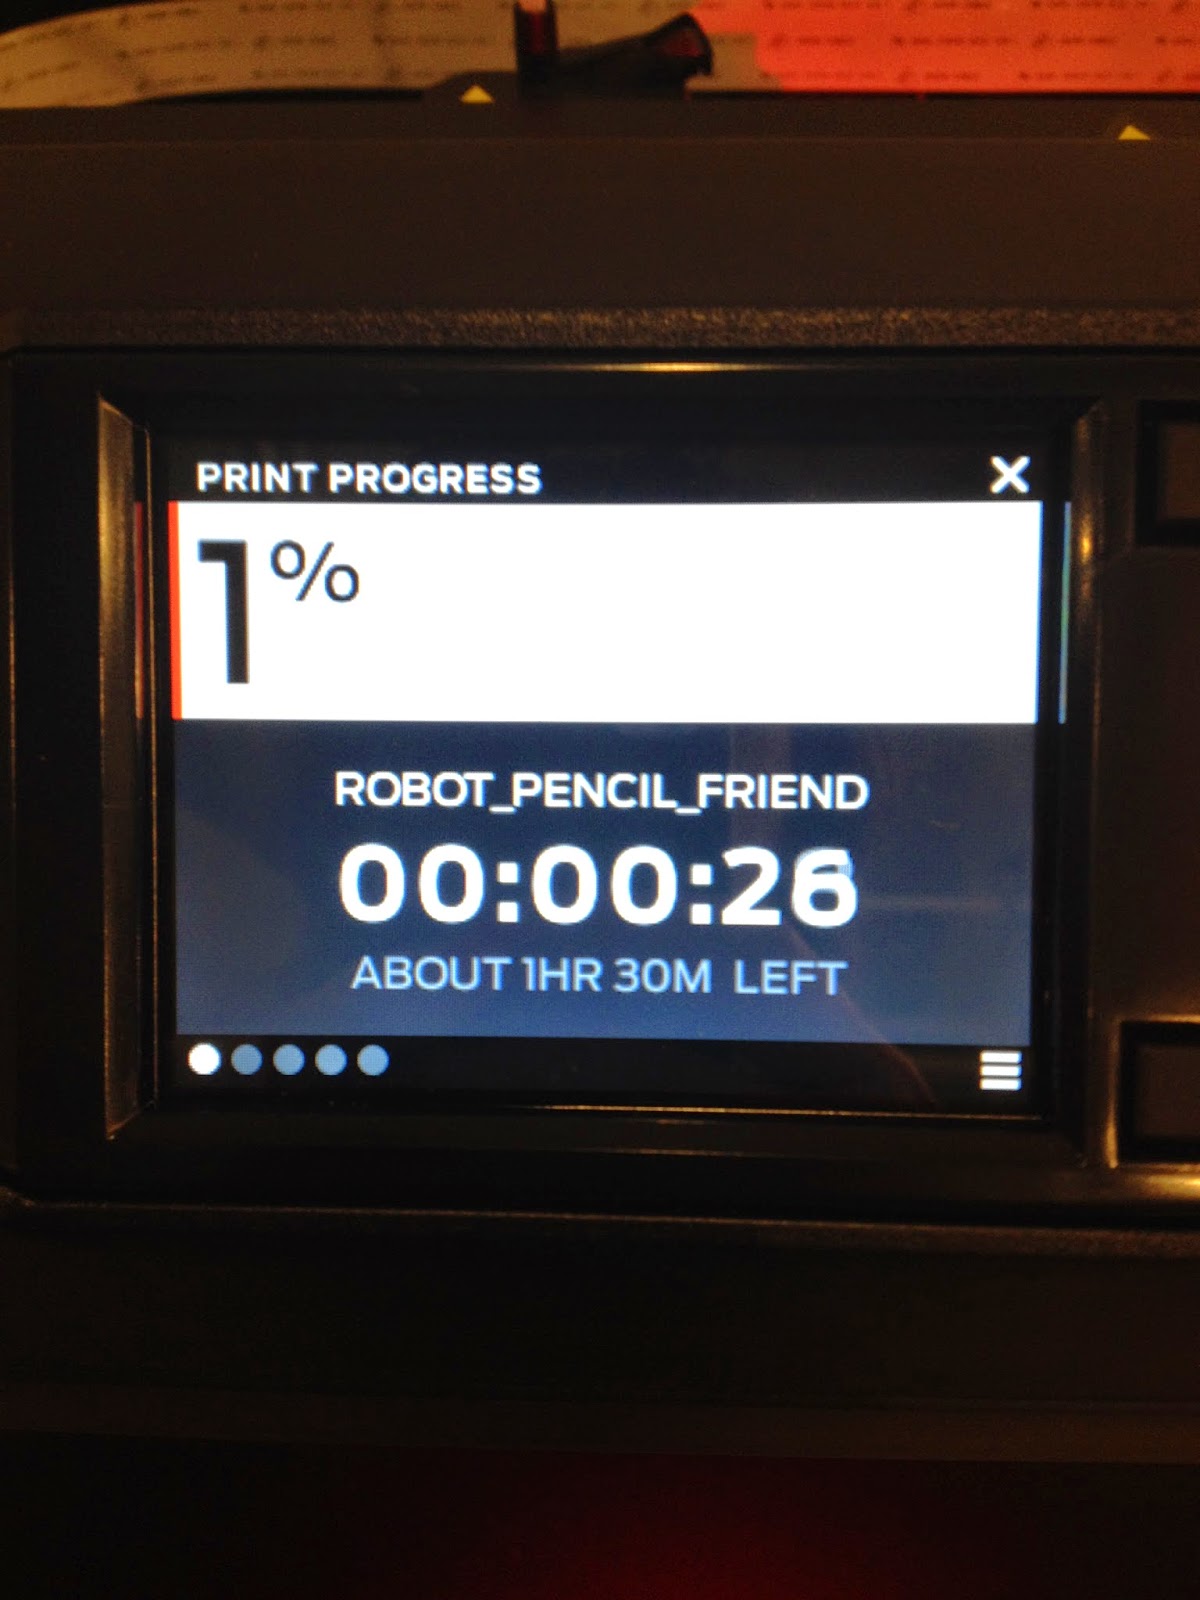
 My particular print was estimated to take 1 hour and 30 minutes to complete. In a separate program from Makerbot, I designed a robot head pencil topper. Several programs are coming on to the market for designing prints but most of them are CAD-based software/sites. CAD stands for Computer-aided design and slips into the realms of architecture, product design, and even medical product manufacturing. It is a VERY real-world skill that students can learn and master before they graduate - and we as teachers should be all about relevance and applicable knowledge.

In one of the books I am reading I was provided a step-by-step lesson in TinkerCAD, an online 3D modeling program specifically for printing projects. It was a super simple interface and TinkerCAD even offers classes to help you learn how to move, scale, rotate, and connect objects. As you take classes, you gain experience and new classes are made open to you. You can learn how to make name tags, dice, bracelets - the list goes on! I only did the basic classes to become more familiar with the commands and controls.  TinkerCAD provides basic shapes to design with and allows you to create holes as well as group objects to form one big shape. I would incorporate the art concepts of shape, form, perspective.. the list goes on and on! The important thing is that students are experiencing spatial reasoning and coming to understand how the shapes interact and connect to each other while they are creating something really cool and original in the process! I think the robot head pencil topper would be a great starting project for students and I will provide instructions for it to my audience at the conference... just in case they are interested in trying out TinkerCAD themselves! Anyway... yeah, I made a robot head!
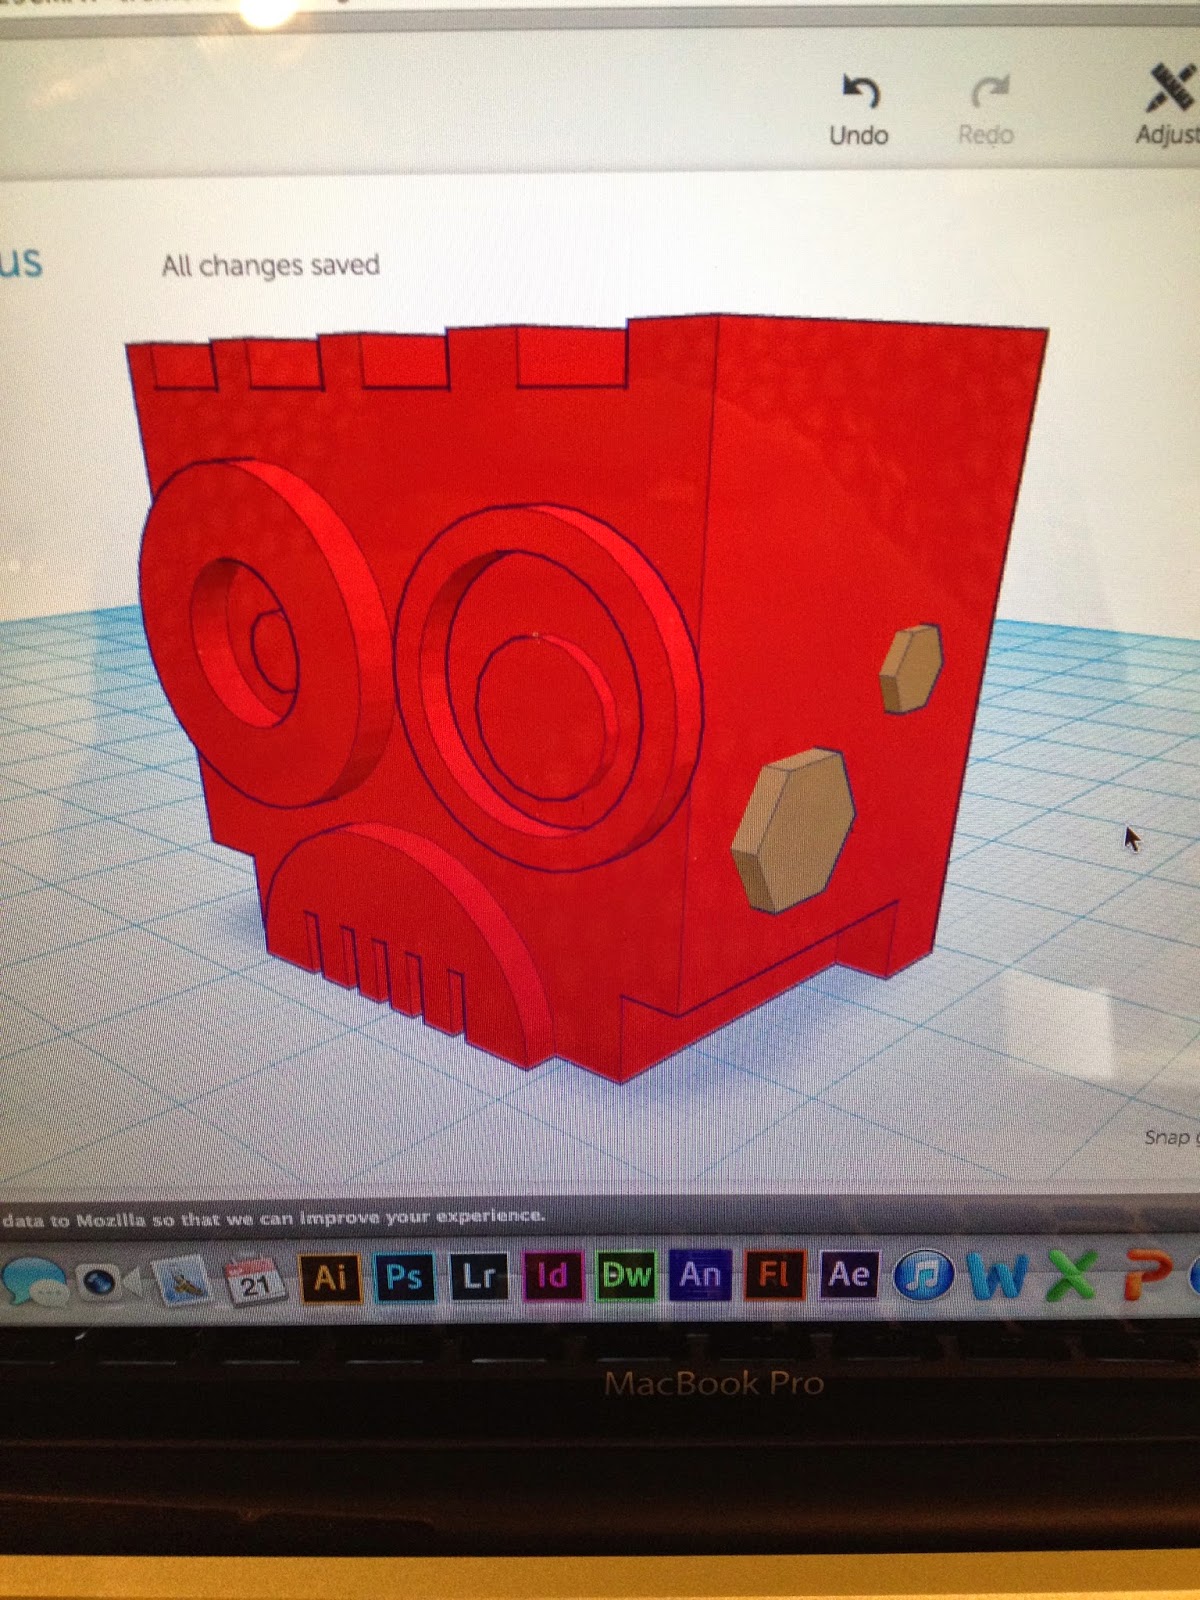
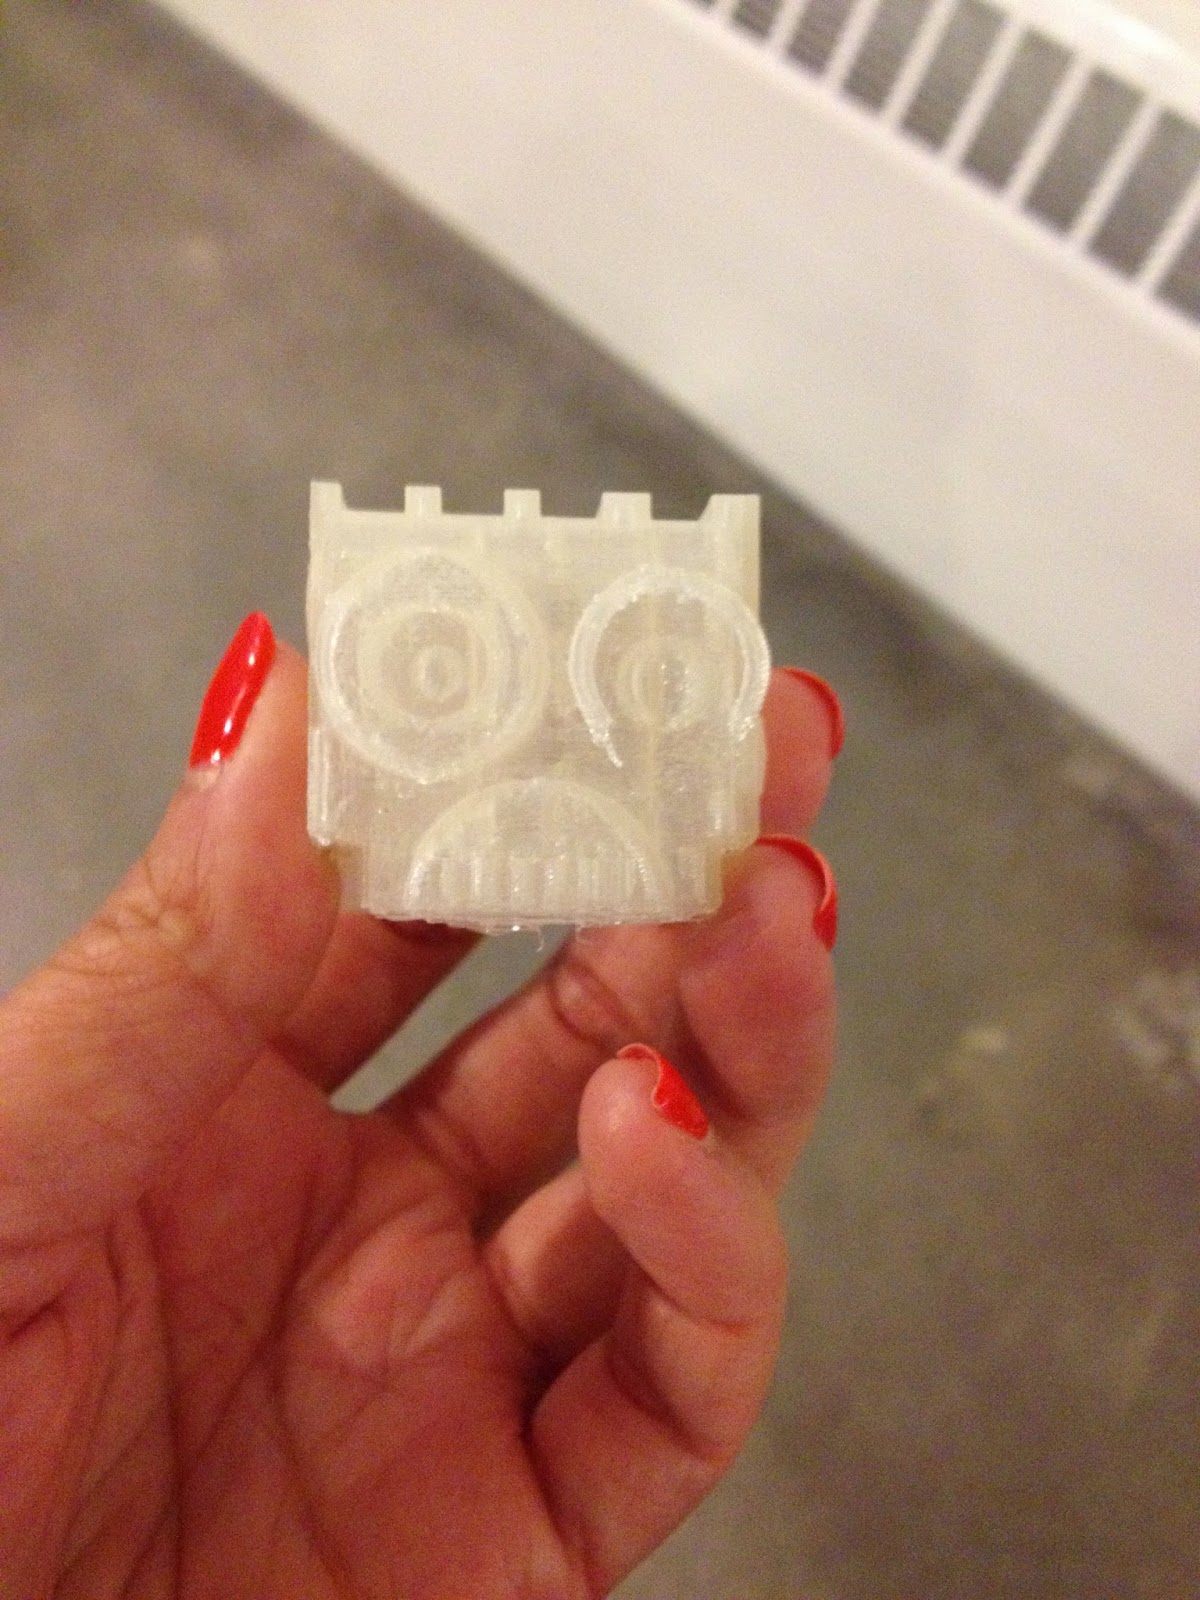
my robot friend :)
One thing you need to know about 3D printing.... the size of objects is crucial. As in any other manufacturing process, the larger and more complex your object or product is, the longer it will take to print and produce. That being said, my little robot dimensions were given in millimeters! Talk about a tiny print.. but in terms of a teaching moment, this would be perfect for math teachers! Or overzealous teachers in other subjects, I suppose - converting millimeters into inches would give students an idea of the size of their final prints and they would also be able to scale up or down to their desired print size. I was lazy and used an online converter. Bad... but for lack of time I made do. Students could also learn about perimeter, calculating volume, and rounding up numbers...
A smaller print will take less time, but if it has more detail you have to account for that extra work the computer/printer will have to do to make a clean print! I made lots of details on mine (bolts, rings, holes..) and it added extra minutes to my final print time. Keeping that in mind, size does matter and detail even more so! The inside of the robot head was hollow with walls on all sides. There was a smaller, round hole in the middle for the pencil to be inserted into and I learned a LOT about wall thicknesses before even thinking about printing... that was a tricky part of the design process. Figuring out placement of holes and walls. But I figured it out eventually.

the waiting... tick tock
Again, my print was set to take about an hour and a half so I settled in for some careful observing and worked on taking notes and other projects.. this would be a downside to printing in the classroom. THE WAITING! No kids like to wait.. and frankly neither does Ms. K! So if incorporated into an active classroom, the 3D printer would be going at all times, printing multiple projects at once.. And someone should be present when the printer is running. Aka DO NOT leave your printer unattended overnight to make that spongebob figurine so and so wanted because you could have a serious mess or worse on your hands! 3D printers should be treated as a machine to be respected and given distance. They get HOT and should be monitored. One cool feature on this particular Makerbot model is the extruder camera - yep! You can actually stream live video from your printer to your computer to watch your print being made! Something appealing for keeping track of different prints and showing students the printing process.

about 3/4ths of the way into the printing process..so close!

my finished print! ready to be unattached from the print plate
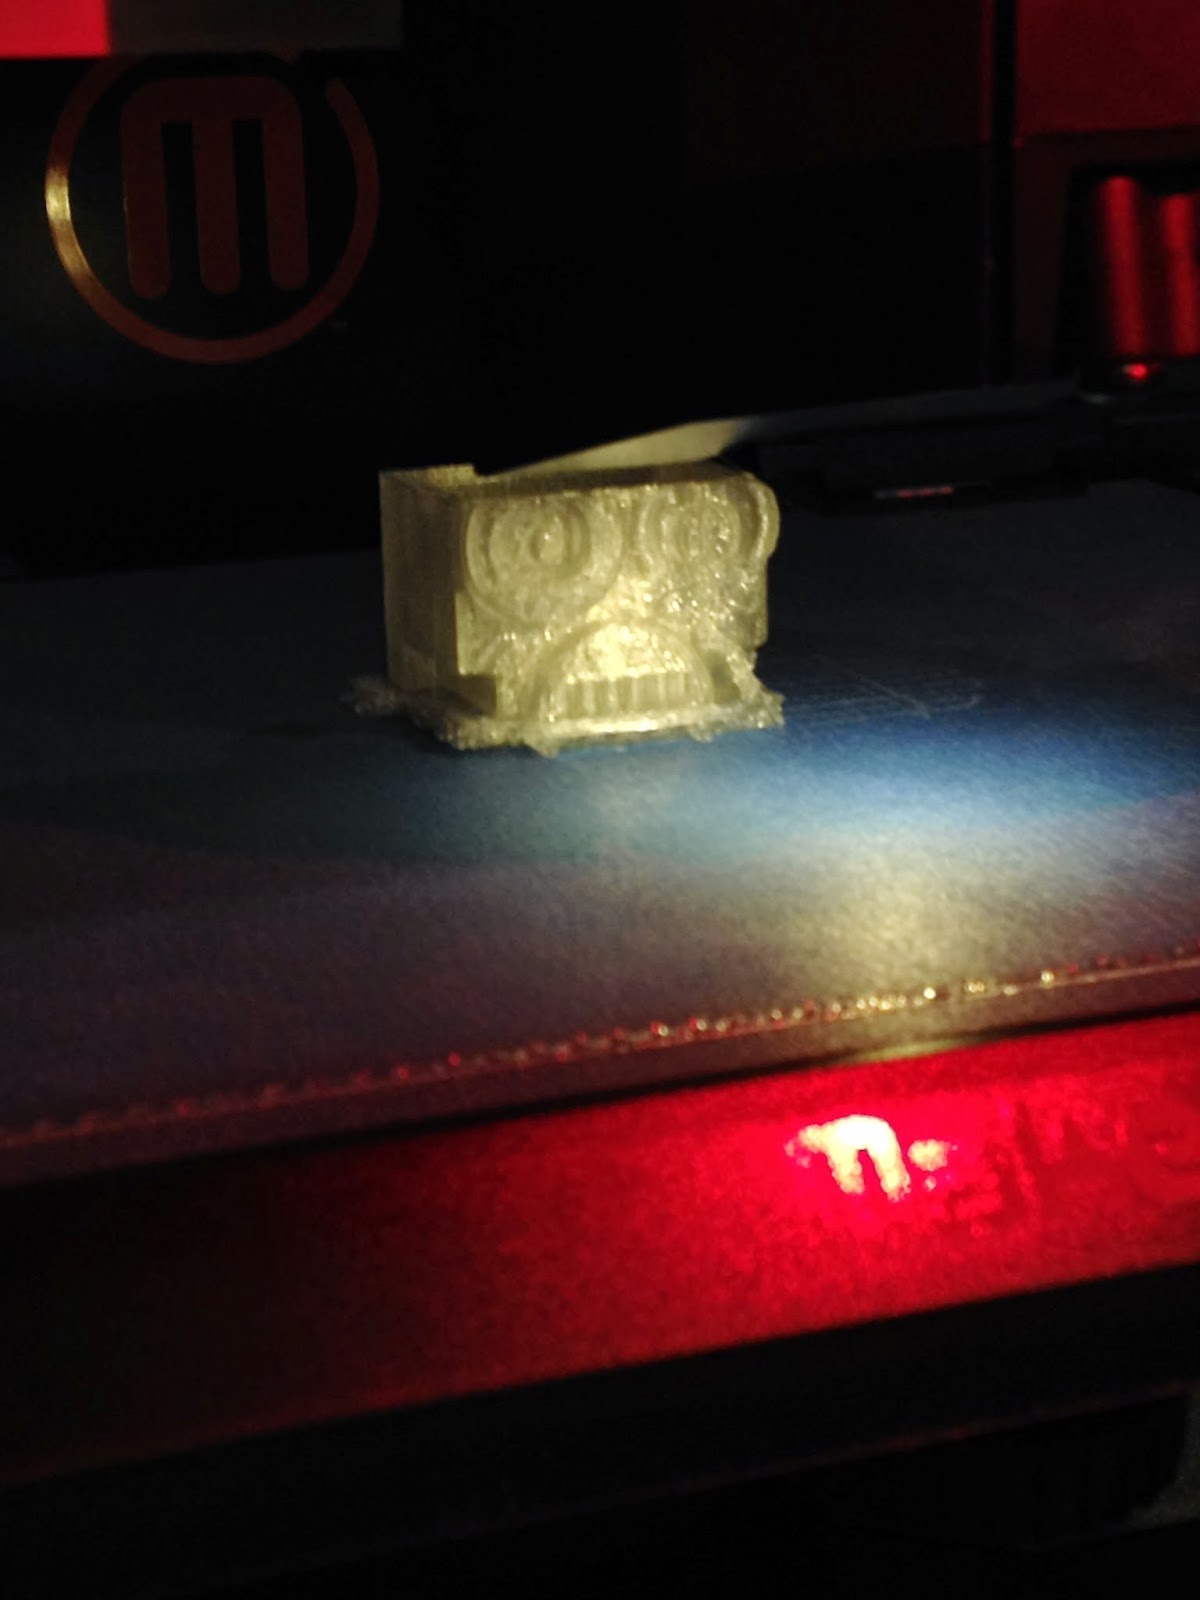
One hour and 30 minutes later, my robot pencil topper was completed! To remove the print from the plate, my teacher and I used a scraper to gently peel off the PLA from the tape surface. Kind of like scraping ice off of a windshield, but with less swearing and frustration haha
As stated before, the inside of my robot was hollow, but I had a problem. One of many topics stressed in my research is the importance of failure and learning from mistakes. Well.. I didn't completely fail, but I did realize my errors. For starters, when constructing the robot head I had to insert a 'hole' cylinder into the middle for the pencil to fit. At a later stage, I needed to create a hollow top, which would decrease the print time and also allow for some literal wiggle room for the printed bot on top of the pencil. The problem was I made my walls very thin and also made the top of the robot (top wall) too far away from the side walls. This meant that my robot sat crooked on the pencil top because there was too much space surrounding the pencil on the inside!

Talk about planning... 3D printing is ALL about spatial reasoning, planning, calculating sizes, learning from mistakes, internal volume, design.. it's a mixed bag of educational concepts. AND to top it all off it's a really fun way to create 3D objects and bring them to life with technology - to hold in your hand or stick on your pencil eraser! Again, I would probably utilize this lesson as an introduction into CAD programs and 3Dprinting. I would be able to do multiple prints at one time - depending on sizes and how big my print area was - and that would give the students who needed extra time to design or extra help the chance to work on their robots while the other designs print.

Time management was a big aspect of printing, too! Again, a great skill to teach students.. and adults for that matter. I spent about 45 minutes creating my robot in TinkerCAD and then had to wait for the hour and a half for it to print.. in that time I was able to start designing a new print which utilized more rounded-off objects like eggs, spheres, and ovals. What will be interesting is when I actually print it. There will be a lot of support material needed to hold up the different curves and edges of the shapes. The only way to find out is to do! I will also be making this model hollow to cut down on print time, like I did with the robot head.

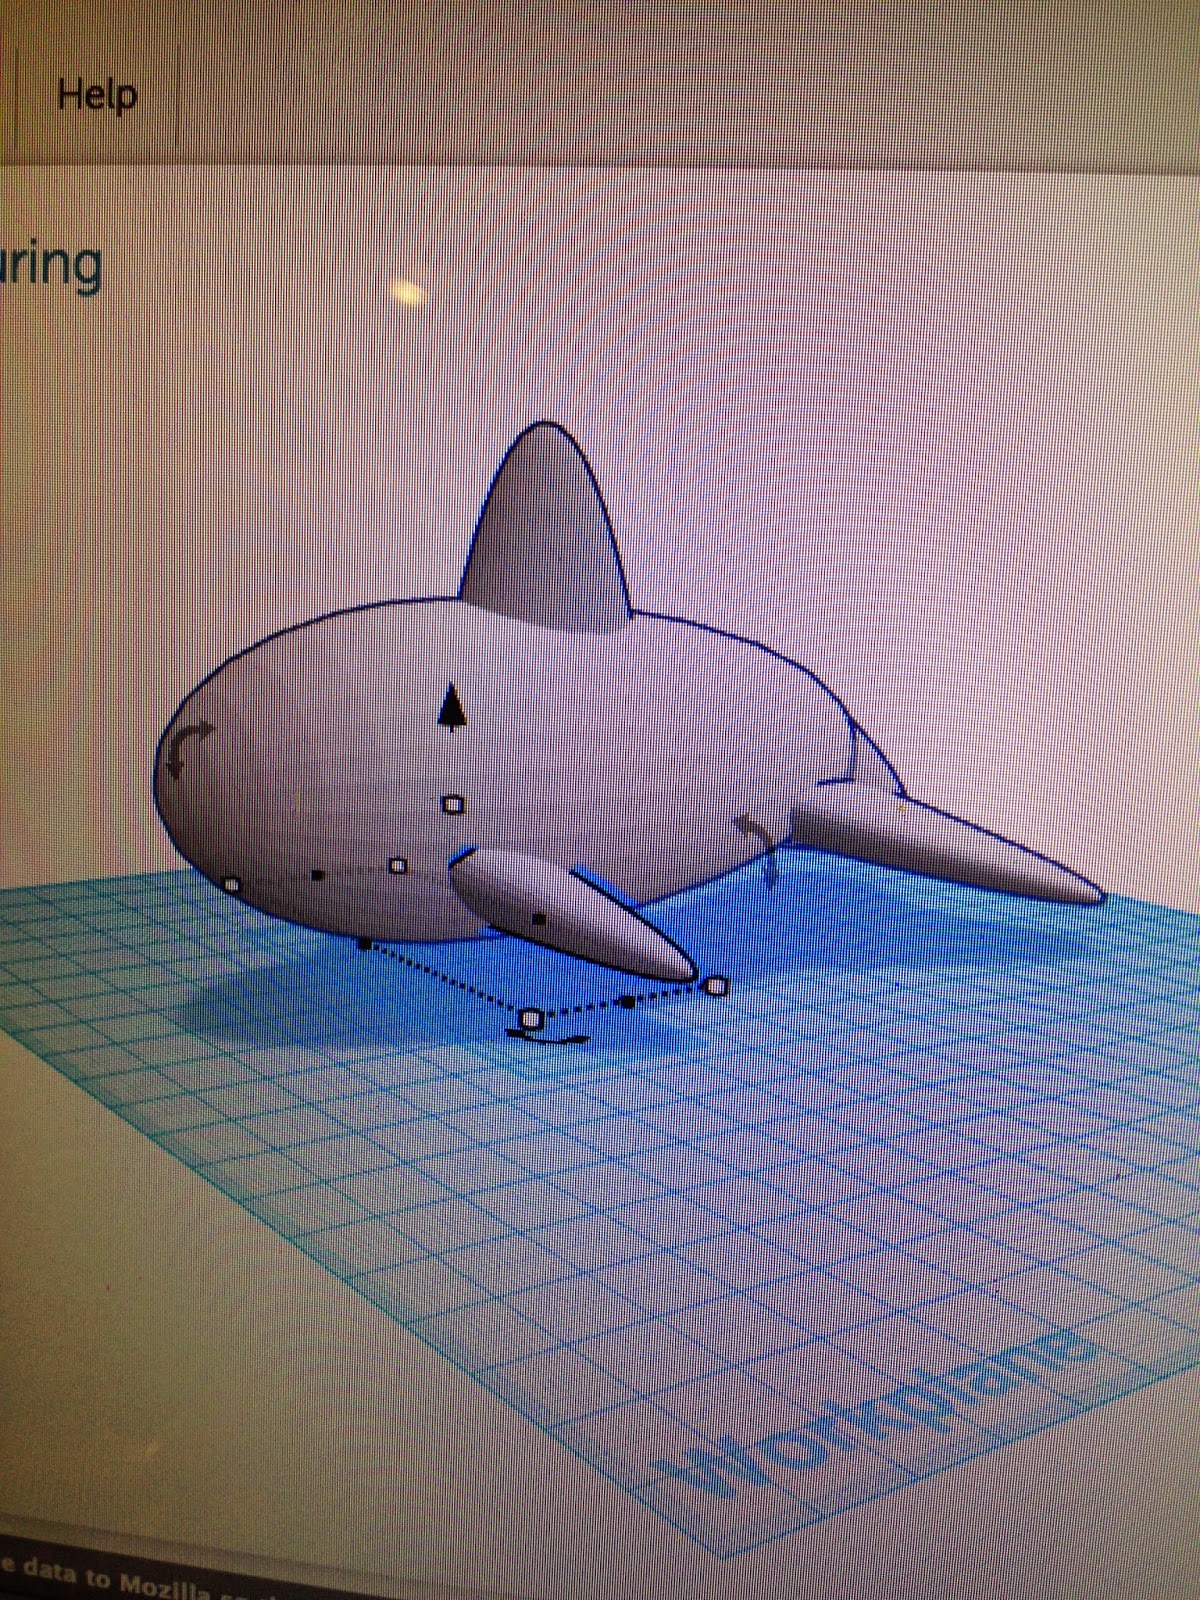
whales are kind of my thing..one of many.
 Overall I chalk up this experience as a success! I learned a great deal about the print process, planning designs, and finally troubleshooting for future prints. 3D printing as a teaching tool could go miles in hands-on learning instruction. Over the next few weeks I will be making time to return to the Design Lab and creating different types of prints to try on the Makerbots. My professor gave me his office hours and the go-ahead to do all the research and playing I needed to! :) It's pretty exciting. I think I will have quite the arsenal of knowledge and experience to bring to Lansing this fall. In the meantime I need to crack down on painting, photography, graphics.. all that good stuff I signed up for back in the beginning of the year! One more year of classes and then I am student teaching FINALLY. Perhaps by then I will be settled in to a school and ready to start 3D printing with my own students... I can only hope :)

Until next time!

Ms. K


Monday, August 18, 2014

Elementary Camp: "Breanne's not a craft lady. She's the art teacher."

"I know a recipe to make Breanne. 2 parts crafty and 3 parts camp."

Elementary Camp and the end of the season...

So.. it's been said before.. k-5 kids challenge me immensely. My patience, my organizational skills, the volume of my voice - all of them are put to the test when the littlest scampers arrive! However, when I see messages like that from the parent of a returning camper I smile wider than ever :) I planned lots of activities for these high-energy, high-VOLUME campers and I like to think I adapted to their personal learning needs and preferences.


first things first - name tags!
 One of the board members donated some laminate samples from her work. ONLY A FEW. The morning the campers arrived I enlisted the help of the other staff members to drill holes and sand off the glue from the backs of the samples to create name tags. Then we strung on some lacing *gimp thread* and beads for a little bit of fashionable flair. The kids loved them! We decorated with sharpies and some kids had stickers, too.

The first projects we worked on were not in my original plans - go figure! Being an art teacher/craft lady = flexibility at all times. Anyhow, the first two projects were rockets and day group sculptures. To clarify: day groups are the various assortments of kiddies as they are separated throughout the day. Counselors have a mix of boy and girl campers and each day they organize different activities and group games - it creates a really strong sense of ownership and belonging for the campers. I was asked to orchestrate the construction of day group centerpieces - umm..okay? So I went for it!

So many tiny houses - I have a jug of old game pieces. 
my favorite - by far. it was over a foot tall!
 So the main goal for the project was to create a big, colorful, unique centerpiece for each day group table. In my controlling way of doing things.. I separated the process into steps! First step was to sit with their day groups, for obvious reasons. There were so many different personalities; this was also a good way to see how different campers took control - or sat back and let others lead. I want to do this project with students! I think it would be a great way to break down barriers between kids and form teams..
planning committee
The plan went like this:
  1. Sit with your day group! Do not stray to the other table/team because they are your competition (all in good fun, nothing vicious lol) and you will have great ideas with your group members alone!
  2. Choose three pieces of scrap wood. ( I had a bunch of scrap wood left from other camp projects and from the wood pile at maintenance. ) Think about how they could fit together. Your centerpiece MUST stand on its own when put together! We don't want them falling into the food :)
  3. Work TOGETHER to plan the structure before anything is put together! Remember, you are a team and this centerpiece represents your entire team - not just the thoughts of a few people.
  4. One or two people are in charge of hammers, nails, glue, and construction materials. (This eliminated the problem of bottlenecking at the glue guns and with the hammers etc). If you are not using a hammer/nails/etc DO NOT TOUCH IT! These are tools, not toys. Be careful and be aware of those around you!
  5. After the basic form is constructed you may begin to decorate! (At this point I passed out ribbons, pipe cleaners, the little game pieces, markers, and pretty much anything else they asked for) You can do a church-themed design or just make something awesome! EVERY PERSON in the group needs to glue on at LEAST 1 ITEM. (prevented those controlling kids from taking over the whole project - sneaky Ms. K.)
  6. writing the names from the group
  7. Make sure you put your name(s) on the centerpiece so we know whose is whose. Give yourselves a pat on the back - you worked in a team and that is really hard to do. What did you learn about your team members? What was most successful when you were putting together your centerpiece? Did you have any difficulties? What was the most fun about this project?
an offering dish
ahahha enough said! 
planning and discussing ideas - future CEOs ;)
 As stated before, project 2 was ROCKETS! These kids are so spoiled - one of their grandparents comes and provides rockets for the campers to build. Each day group got their own rocket so it was perfect! The kids worked on their centerpieces and their counselors painted the rockets to the kids' specifications :)


Throughout the first day, each day group worked on their centerpiece. In all, there were 6 beautiful 'sculptures' made to decorate the dining room tables. The kids had a really fun time and I loved watching their minds at work! Every group had a different idea and took different amounts of time for each step  - very fun :)
so many little game pieces

"Let's make sure we all get to think!" haha too cute
church camp-themed
Day 2:
After the day groups had finished their centerpieces and taken them to show off in the dining hall it was time for a new activity! Of course, craft lady had put out all the stops. I offered several options for projects and brought back the concrete stepping stones and planters, too.
this was the cleanest the cabin was all week! hahaha
One of the most important lessons learned from working with Quickrete: MAKE THE KIDS MIX IT! Saves time, energy, and they genuinely want to help.

stirring their brew
 Also, I figured out the secret to not messing up the stepping stones - Plastic wrap! the downside is you lose that really nice, smooth finish on the sides but I didn't have to bash them out of the molds to free them. You win some, you lose some, right?

tiny tiny stepping stones/paper weights
I added some artistic flair to the white board... CAMPVENTURE TIME

 Day 3:  was interesting... I substituted my craft periods for Archery. One of the biggest things I learned at camp this year: BE FLEXIBLE! This campers were grades 4 - 6 and let's just say.. their attention spans were very varied! But I made sure that everyone went through orientation and they all hit the targets - we even had two bulls eyes!


2 day groups per teaching session, 15-20 kids per day group... nearly EVERY camper and some of the counselors wanted to participate. Oh, did I mention there were 6 day groups? So.. let's do the math. Three periods of archery x 2 day groups per session x 15-20 kids/counselors per group. Uhhh that's the whole camp! 

a quick moment of relaxation before the MADNESS continues
 More scampers ready to go? Another orientation session in progress.
working on grip
As a recently certified archery instructor I have learned so much about teaching students/campers one-on-one and the ins and outs of specified attention. For example, I learned in my class that there is a specific strategy that allows me to cut out doing a mass orientation and focuses in on each individual archer. Problem with that is TIME.. I only had 45 minutes with each pair of day groups and even then you have to account for hyperactive kids, people not paying attention, wind, bugs.. the whole nine yards.
bow arm check!

in shooting position
  Here's the strategy I was taught by my courses:
1-on-1 First Three Arrows Strategy

1. instructor invites one student at a time to the line
2. “stand facing me with your feet like mine” – demonstrate stance
3. show how to hold bow
4. show how to nock an arrow (listen and look)
5. demonstrate proper holding technique for bowstring
6. demonstrate archer stance and form
7. release arrow (first arrow)
8. repeat steps 1-7 with less instructor interaction – maybe just pointers
9. repeat steps 1-7 (student –led)

PRAISE PRAISE PRAISE

I think in the future I will work with this strategy.. as I had fewer campers I was able to focus more on individual needs and concerns. The campers listened much better when they had one-on-one time and  I was able to get to know them, too. 

Day 4: I was allll over the place! Between cleaning bathrooms, helping with dishes, and teaching.. I think I grew some new arms and legs, to be honest! Two of the day groups had skipped out on a day of archery in order to go on a hike so today was the day they were able to participate in archery lessons. These kids were also the oldest so I didn't have to yell QUITE as much at them. They listened well and were eager to start shooting. One of the best things about this week? The willingness of the campers to HELP. Every day I had volunteers offering to help carry targets, bows, and other supplies to the games field. On the first day of shooting I was actually still painting the range - timing is truly everything! - but the campers offered to help with that too.

cheeeese
 I had one of my returning campers this year whom I get a kick out of. He has such a great sense of humor and so much spirit and willingness to learn :) He wanted to shoot archery with his fellow campers and I wasn't sure how he could. He has a congenital deformity in his arm and hand which makes his left arm much shorter than his right. He assured me he shoots archery at home and would not have any problems.. if the bow was left handed. I felt so bad! The bows I purchased for the program are right-handed and there is no way to convert them otherwise.. I apologized to the camper. To which he replied "Don't worry about it! I've got this." He promptly changed the arm guard to the other arm and set himself up in shooting position. He had the most power behind his shot of all the campers in his group! Nothing was going to stop him from shooting that target :) Lesson Learned: if the archery program is going to expand I need at least five more bows that are left-handed or convertible.

enthusiastic archers!
This group had quite a few home archers/hunters and they all did really well with their grouping and most importantly PATIENCE. They listened and learned the safety procedures and didn't even think to move from their stalls until told to do so. Such good ponies-- er, I mean, campers.

smile if you love archery!

practicing T-form will get these kind of results!
All in all.. this particular group of campers was a lot of fun. Not to say they didn't challenge the almighty patience of Smaug the craft lady (as I was affectionately known by the end of the week), but
it was a lot of fun to see so many returning faces and smiles.
I am now recognized as THE art teacher or THE craft lady.. and this is where things become complicated. After this summer I will be preparing to student teach and I have no idea where that will take me. That being said, I am not sure I can return to camp for another year of crafts/maintenance/various odd jobs across grounds. In addition to life conflicts there are also personal reasons I am thinking of retiring the rainbow apron I wore every day in Rockland. The main reasons having to do with management of time, resources, and people - many changes need to be made for camp to function and not just look like it is running at 100%. But that's another issue entirely.. I want to get back to the fun stuff!

I will save my reflection for the next post: Smaug the Magnificent Craft Lady signing off!

Ms. Kanak

Monday, August 4, 2014

Delayed post: Junior High Camp

 Oh my.. this summer is flying by faster than I ever thought it would! We have already come to the last few weeks of camp and if my face in this post is any indicator of the time I am having.... mischief abound!

Two weeks ago was was Junior High Camp and it came and went with its share of challenges and victories. My own victories being some pretty cool crafts, program organization, and of course getting to see some of my campers from last year. A lot of them graduated this year and will be freshmen in the fall - such a proud craft queen was I :)

Cézanne helping plan activities
 I planned a LOT of activities for this group. They have to be given access to multiple media and explorations to stay out of trouble. I made sure to provide as many choices as I could, such as:
--string art
--concrete planters
--concrete stepping stones
--drawing
--button making
--bead animals
--Gods eyes
--Gimping
---many many many things!

the boys just wanted to color with crayons CONSTANTLY

step one for string art: draw/plan your designs!

making buttons about camp and its greatness - priceless

UM YES. STAR WARS BUTTONS.

Fully stocked cubbies :)


Junior high deans took full advantage of the new programs: fishing and archery! Unfortunately, with the timing of my craft periods I had to lend out my fishing gear and let the kids run rampant with it. Har har, just kidding! We had the lifeguards watching them to make sure no one fell in - unless they wanted to. Archery, however, was another story! I was able to carve out an hour a day to teach archery to the campers and 3 of the 5 days I had a full 'class'! Some of the counselors even came down to shoot a few rounds. I was excited to be able to provide the kids with 2 more arrows than they used to be able to shoot - thanks to the camp director being so supportive :)

prepping..

nock arrows!

draw... 
This group was SUPER competitive! Not just during games but also during archery! A few of the kids made 'bets' about who could hit the bullseye, who could get closest to certain parts of the target etc.. they made up their own scoring methods and did a LOT of trash talking. Too funny! Some of the girls were walking around calling themselves Katniss. That's the kind of motivation that makes master archers!

One of the projects I was most excited about was anything - and I mean ANYTHING - involving the big old bags of Quickrete we purchased near the beginning of camp. I found some cool projects involving plants (of course) and making molds for planters/pots. I spent the better half of a day creating cardboard molds for triangular planters (found here.) In typical camp fashion, the craft lady can often get carried away with her projects and overestimate the amount of interest in one particular activity.. so I had one camper work on the triangular planter and the rest of them made some pretty adorable stepping stones and paperweights.
Making concrete for paperweights - making some MUSCLES, TOO
 I found some great old muffin tins in the kitchen basement so I wanted to see what kind of trouble I could get into with those... turns out quite a bit!
This camper was very excited her shoes made it into the photo . Seriously
pouring stepping stones - probably saying something along the lines of GO GO GO

these campers were working on a stepping stone for their church

making decorations for banquet

drying in the sun :)

working on cardboard molds
self portrait?


tiny stepping stones 
A TARDIS!

making bead animals

Gods eyes were really popular !

making triangular planters - pretty cool project!

String art of various shapes and sizes - all kinds of designs!

my campers made me a pair of antlers...business hat
I think overall Junior High was my favorite group of campers. There were some pretty unfortunate maintenance/cleaning issues that came up but other than that the kids were great! They always wanted to work and help out with projects and planning. I had kids helping make buttons and pour concrete and sell gimp.. It was nice! I didn't have to be in 900 different places at once and I could focus in on the kids who needed more help or back off and let them figure things out. I really enjoyed working with this group of campers because of their willingness to learn new things. Junior high are a great age group - learned helplessness isn't as big of a factor and each kid had something to prove. Whether it was figuring out bead animals or planning a string art piece, every day kids were accomplishing multiple projects and making new friends. I had very few discipline problems and as stated earlier it was great to see some of my campers from last year... camp is a big deal for a lot of the kids and consistency is important. They were as excited to see the retuning staff as we were to see them! I wished them all luck for the rest of their summer and school year and by then.. it was time for elementary campers to arrive!

More to come,
Ms. Kanak