Monday, December 15, 2014

303 - Reflections and Results

I am slowly but surely catching up with everything that has happened in the last couple of months. Because holy WHAT it is already December?! Yeah... okay. Wow.

Anyhowways, 303 is over and done with finally! It only took a little over 4 years... and all of my remaining sanity.
To explain... 303 Individual Art Review is a required process for art majors at my college. The way I have been describing the courses to peers and observers is.. it's a progress report for my ENTIRE degree/concentration. I wanted to present a large breadth of work, as discussed in a few earlier posts (In ProgressNear completion), about the health issues in my family over the past few years. The actual execution of the drawings and compositions provided so much catharsis - I would often spend hours on each drawing without thinking about time or how much my hand, and head, were hurting.

The 303 review was easily the most stressful process of my degree so far. Even though my work was finished and ready to present (for the most part - those big canvases are BEASTLY) the stress of talking about the work and explaining it to an unfamiliar panel was nervewracking! In addition to that, I had the teaching conference in Lansing to prepare for - no pressure, right!? Wrong. All of the pressure. All of the double and triple checking and making sure everything is ready to show and display. I had a panel of 7 faculty members, including my education and concentration advisers, who wanted to talk about - and challenge - my work, statement, presentation, and progress as an artist.


in-class critique

Most of the feedback I received concerned process - something I thought I had covered in my statement. In truth, I forgot to reference some very important influences and I was kicking myself pretty hard for that! My panel wanted me to reference the Surrealists and Paranoiac Critical Process - meaning the subconscious motivations and inspirations we have for creating and inspiring work. Uh, duh. Spending so much time and unconscious emotional energy on each piece should have prepared me for that comment, but in honesty I was working from repressed memories and feelings I did not want to address previously. You cannot say 'working from the heart' in a professional review, but that is what the process entailed the most. 

MORE in-class critique

The panelists judged my work in several categories, including: Physical structures (skills and knowledge), Physical Structures (productivity), Visual Structures (visual evidence), Visual Structures (oral evidence), Social Structures (visual evidence), Social Structures (oral evidence). What this all boils down to is being able to defend your work, your choices, your process, and how you talk and write about all of the above. The grading scale ranges from 1 to 5 with 3-5 being satisfactory in each category. In my review my statement was challenged, along with my process, in terms of cohesiveness and marriage. My method of executing the work was so deeply personal - I really struggled to write about the process and the meaning behind it, even though it was clear and present in my mind.

the final grading results

After my review, which I passed with mostly 4s and 5s, I realized how much I still have to do when it comes to talking about my work and presenting process/findings. My panel gave me lots of good ideas about presentation, mainly for the large canvases. I plan on creating tapestry-type hangings so the work can be hung on the wall like banners. I also plan on creating more large-scale prints of the drawings and possibly (even, maybe, someday) printing onto glass or plastic to present the work in a transparent media. I was presented with questions about the lack of color and conversely the lack of white space. 

I have a lot of decisions to make before I start working on my senior show pieces, which will be extremely similar in process and product as my 303 work. My master plan is to explore my own health concerns/issues that I have struggled with over the past few years. In the next post I will discuss that some more.. I really really wanna blog about my conference experience now though! And since it's my blog, I do what I want! So you will all have to wait ;) 

Ms. Kanak

Saturday, November 29, 2014

3D Printing & ArtLab...Experiments!


Oh wow.. I feel like the months of October AND November flew by at warp speed and that is only slightly overwhelming! SO many things have happened in the past few weeks... mainly 303 is over and now I am moving forward with my ideas for ArtLab and various new explorations of the existing series of drawings. For starters, a few weeks ago I started scanning in my drawings to save and edit them for printing optimization. Photoshop now has 3D printing and modeling capabilities! Soo.. I kind of lost focus in my graphics class and started playing with that instead. The first step was to import the drawing and select the drawing from the background.


After selecting the images you want to render in 3D you have to make sure you are creating enough positive and negative space - throwing some art terminology in there. My favorite thing about this process, which is probably indicative of my budding OCD, is eliminating the tiny areas of empty space which ultimately create balancing points, holes, voids, and textures. 


You have to select your primary figure and create a NEW LAYER in a NEW DOCUMENT. This will remove excess information from your outline/shapes and make it easier for your computer to process the model mesh. I learned very quickly that deleting the background and using the default checker background instead of white as a background color was the best route to take.


Photoshop has several different texture filters and options for surface treatments. This particular effect was a displacement of values determined by the brightnesses found in the selection. The darker the 'shading', the higher the elevation or height of the model from the base. Unfortunately, my school computer decided to up and quit all my applications before I could save the model - an occupational hazard. In addition to that I had to prep for projects in class and for 303... which I will get to in a different post or this one will be several DAYS long. 


editing the model in Makerbot software
A few weeks ago I went back to this process and started working on a different set of drawings to create selections and prints. I spent more time working on selections to refine my print information and area. Selection options in Photoshop allowed me to create separate layers for specific drawings/sections of drawings. I worked with three different models to experiment with sizing, complexity, z-axis heights, and to push the limits of Photoshop as well...it was definitely testing the limits of my patience.
this selection took much longer because of all the details and the differently colored background
Photoshop allows many changes to be applied to the mesh or skeleton of your model. I experimented with raising the height, tapering edges, adding bevels, and stepped elevations. When I took the model into the Makerbot software to optimize it for printing, I ended up losing a lot of the information from the Photoshop files and the surface treatments were removed when I changed the height. Lesson learned: Make sizing changes IN Photoshop if you have specific effects in place.


this model took about 1 hour to create/edit
Each model took about 1 and a half hours to print and I had NO errors - a veritable miracle with such complex models! I was very pleased with the results and the details captured in the prints. I have not tried to remove the final prints from the rafts.. call it cowardice, but I do not want to ruin all that hard work! I took lots of in-progress shots to show the complexity of the models - I am still in shock at how much detail was captured by the printer itself!


before the final layers were printed...
As stated before, two of the prints had surface effects applied to them and I unfortunately removed those when I was changing the height of the models. What I found was that the printer was compensating for the lost information by creating the layers under restricted height. I will have to take a close up picture but the surface of two of the prints began to resemble a topographical map - specific areas of elevation divided by defined lines. SUPER cool happy accident, for sure :)


I plan on utilizing these prints in my final Drawing/Painting project of the semester as well as ArtLab. I intend to display some prints mounted in shadowbox frames and possibly others on free standing pedestals in ArtLab if I am accepted. I want viewers to see the work from multiple angles and 3D Printing provides that unique opportunity because the process by nature is selective drawing with the addition of 3D modeling. I have to turn in my edited proposals by Monday and then will hear back next week if I am accepted or not -- I think I have a good chance of getting in! They really enjoyed my artist statement and provided a lot of constructive and helpful feedback.

On that note.. I need to get back to work on class projects. I have photographs to take, web designs to put together. The list goes on and on. However! In my neverending efforts to catch up with my own life, the next two blog posts will be a response to 303 and finally some reflections on the Michigan Art Education Association Conference in Lansing!
That means I am only two weeks behind... hopefully before the first of next year I will be on track, eh?

Happy almost-another-holiday-break! Hang in there.

Ms. Kanak

Tuesday, October 14, 2014

Some days and things

We all have those days.. those days when we want to crawl back into bed and say no no no NO to doing pretty much anything useful or productive... I hate to say it but on those days you just have to remind yourself that you are not totally useless, you DO know what you are doing, and that technology is just as stubborn as you. Last Thursday. Holy.. struggle day.

large prints for critique!
I had a really good week other than that afternoon, really! I had critique on my large prints from the previous series.. I need to narrow down which images will be on display/in review for 303. Critiques in my other two courses went really well, I was on track with my work and meetings and everything else, but there are just some days where technology puts its big metal foot down and decides you are not getting anything done.

Thursday afternoon I was all set to print some more drawings onto canvas - I had designed a large banner print using the drawings from the first series. The final size would be somewhere near 6 feet long/tall and a little under 4 feet wide. SUPER awesome and big and yes. Not. I loaded the printer with the canvas and then... realized too late that the cut I made to the edge of the roll was not clean. By a long shot. SO, the printer chewed up the edge of the canvas roll pretty nicely and then refused to print anything else. In my stubbornness, I decided to clear the paper jam that was causing all the issues... or so I thought. Turns out there was a tiny, small, speck of paper that had fallen between the cleaning station and the rollers (printer talk) and was just hanging out of reach. So.. 2 hours of troubleshooting with my dad and swearing and tearing my hair out later.. I still had no print! 

Imagine my frustration when the 3D prints I was also working on - because chronic multitasking - were also failing! One big thing I have learned from 3D printing is that.. you are not going to get a perfect print 100% of the time. And about 50% of the time it is your own damn fault. I had created a print of one of my drawings and was attempting to print it as a relief. 

Seems pretty straightforward, eh?
What I did not think to check was the wall and support thicknesses... this basically meant I was asking the printer to create negative layers because my supports were too thin to hold the designs. So the printer started going around in circles trying to build up layers from non-existent supports.. it was a mess. In addition to that! (because there is always more) the filament was not feeding through correctly. Luckily.. I had the manual at my side and I knew this was a common problem with this particular printer. It all boiled down to the extruder -- literally. The extruder was becoming clogged with filament. I have discovered this can happen for more than a few reasons, listed below, but let me tell you.. I was ready to walk out and call it quits!

Troubleshooting:
Can't load makerbot PLA filament into the extruder: 
1. Make a fresh cut at the end of the makerbot PLA filament. Cut the filament at an angle - a narrow tip will help with loading. It is also important that the filament have no bends in it.

If you are still having trouble (YES), remove the fan assembly (cleaning the drive gear). load the filament again, watching to see that it goes straight down through the extruder.

Extruder makes a clicking noise when loading PLA filament (YES.)
This may mean a piece of filament is stuck in your extruder. (Cleaning the drive gear) to remove fan assembly and motor assembly. Any filament stuck in the lower portion of the extruder can be pulled from the heated extruder using a pair of pliers..

My professor ended up doing this to the machines to make sure everything was in working order. But seriously... just like any machine, maintenance is hugely important to it functioning properly. If I had taken the time to check everything was working I wouldn't have had half the problems I encountered that day! Lesson learned: Take your damn time, Kanak.

The next section is mostly for future reference.. troubleshooting forever and on until everything works!

Cleaning the drive gear:
The drive gear is the part of the extruder that pushed filament through the extruder. when you make things with your makerbot, small pieces of hardened PLA can stick to the drive gear.

1. unload the makerbot PLA filament from the extruder.
2. unscrew the two bolts at the lower corners of the fan guard using the 2.5mm hex key included with your makerbot
as one piece, remove the fan guard, the fan, the heat sink, and spacers. keep these pieces together and set them aside.
3. unclip the motor wires
4. pull the motor assembly out
5. find the drive gear on the motor shaft. using a small instrument like a toothbrush or toothpick, remove all the pieces of filament stuck to the drive gear
6. repeat the motor assembly
7. plug in the motor wires
8. add the fan guard, the fan, the heat sink, and spaces to the front of the extruder and bolt them on
9. reload filament

This week....

On a more positive note, I have been able to complete two more drawings from the third series! This series is addressing the health issues my parents were dealing with over the past few years - bursitis, bone spurs, severe nerve pain... all that jazz. 
Iteration 2
I have spent a lot of time away from this series, actually.. Drawing these images makes me feel really uneasy - nauseous, even. I walk away from them frequently and come back to them later to finish what I have started. The patterns and textures are incredibly unstable and shaky, both to draw and in appearance. I created forms to represent the members of my family - curvilinear, speckled, bony masses that hover around and interact with the primary figures. I wanted to show gnarled bones with irregular growths and patterning - to reference the bone spurs and the pain my dad was experiencing over time. I can't imagine what it must have felt like, but I remember seeing him tense up against the pain and gritting his teeth.. the little things we notice, right? I also wanted to experiment with the texture of cracks and crevices, as morbid and twisted as that sounds.. I had not explored that effect yet and it seemed fitting for the condition and the X-rays of the bones and spine.


Iteration 3
After finishing this iteration yesterday I realized I stopped and started it four different times. This particular drawing refers directly to the problems my mom was having last year and that she continues to treat and deal with. I was not home at all for the treatments or for the initial diagnosis - in fact, I received a cryptic text message about the hospital and I didn't know what to think.. I believe that this feeling of detachment and lack of clarity is what made this iteration frustrating and physically difficult to draw. I struggled with balancing elements and tying everything together because I think, subconsciously, I am still trying to piece together the weight of what happened and the sequence of events. This iteration shows a lot of interacting, interwoven, and unfinished forms.. it's amazing what the mind does to piece together what is missing. Luckily both of my parents are doing well now and I feel.. kind of like a jerk to bring up old ghosts, but I need to. I need to provide new interpretations of old fears and the images we all received as observers.

I have one more iteration to complete in this series and then I will be moving on to the collection of work about my aunt. I decided this weekend that I will not be addressing my own health/personal issues until next semester. I am not ready to confront all of those things just yet.. I thought I might be after creating pieces about my family, but I also realized I will need to present work for my senior show exhibition and this idea.. it's ever-changing and evolving as I go. The series about my aunt and her various conditions will be trying as well - but I am looking forward to seeing the results and information with new eyes. Knowing she has recovered and is still kicking, hard, through life. 
In addition to all of these good things I have decided to apply for ArtLab with my work! I honestly cannot remember if I talked about this in the last post or not.. my brain is a little more than fried.

ArtLab is an exhibition of student work that is displayed in the main art gallery on NMU's art and design campus. The exhibitions can be submitted by student groups or by individuals... cue me, being insane.

I am applying to ArtLab with my 303 work. As I spend more time creating large format prints, transporting my classmates into the all-encompassing, nauseating, creeping environments I am drawing, I realize that I want that experience to be shared with others. Not just my classmates or my individual art review panel - more people need to see this side of me and my work. I want to display the large prints - possibly one or more from each series - on the wall of the gallery. In addition to that, I want to project the drawings into the walking space so patrons/visitors can be literally covered in the textures, patterns, environments... all of it. I want to present another perspective to seeing the images and continue that idea of transferring the power of the image to the viewer. The drawings are always going to be taken out of context because the true origins will be hidden.. so everyone can assign their own meaning. That is my hope, anyway.


I have attached the artist statement I will be submitting for review and jurying... It's a lot. That's really the only way I can describe what I am feeling. This process has been transformative for me as an artist and as a person. I am enjoying working on the series, even when it makes me really sad or feel sick to my stomach.. So there's that! I hope to receive feedback from you, the readers, on changes to be made to the statement or installation ideas. I am open to anything, really! So here goes....

Vicissitudes

Vicissitudes are natural changes or mutations, which are usually out of the realm of human control or prediction. Cancers, diseases, broken bones, deterioration, and conversely growth and healing can all be considered vicissitudes as well. In the past few years a number of my family members have had several serious health issues. My series entitled Vicissitudes spans across several years of these life altering, and often frightening, situations. Living nearly four hundred miles away from most of the people involved in the series created a literal distance, while hearing about family members’ respective conditions through indirect messages produced an overpowering emotional distance. I realized in order to create a series which evoked both healing and acceptance, for my own mental and emotional health, I needed to mask the true nature of images so I could begin to view them in a different way. Numerous personal artifacts and references including: X-rays, MRI scans, surgical photography, test results, and medical papers supplemented my process of reconstructing technical and highly personal information into abstract drawings. The structures I have designed loosely reference the body parts and systems being addressed in the aforementioned objects, events, and stories.
My work creates scenes with the absence of color to lend a cold, unfeeling mood to the drawings. I want to echo the detached technical and informational style of interpersonal communication in my personal life and world. By interacting with the images in varying scales and media, viewers are transported into the environments, depth, and moods portrayed in each composition. The power of the image is conveyed and the viewer gains the opportunity to assign personal meaning to what they are seeing – much like I was forced to do years ago.

Each group of four drawings operates as a series and represents a different person or people, condition, or event. Additionally, each person’s condition has been translated into structures and patterns unique to their individual story, creating identities through form and shape. Though not every found object, result, or artifact depicted in the series lead to a happy end or story, the catharsis of creating the works lightened the difficult emotional burdens I have carried with me over time.

Okay.. time to get some other things done. I'm early on my blog post this week. That has to count for something, eh?!

Til next time.

Ms. Kanak

Friday, October 3, 2014

303 progress... 6 weeks to go! Don't Panic.

Wowwww it's already October (3rd). Commence Mean Girls quotes all over everything in existence! In all seriousness... I am in shock that this semester is moving so quickly! I had to take a big test yesterday in Individual Art Review that determines if I will be participating or not. NO PRESSURE, ART DEPARTMENT. Rude.I thought while I had a minute I could update about my progress in 303 :) Everything is moving fairly smoothly and I am trying (trying so hard) to draw every day. Though time gets away from me, I always go back to my work and spend a few hours on what I have started. I completed the second series of 5 last week so... yeah I think I am on track!? I have 11 more drawings to complete in the next six weeks.

Series 2 Iteration 3
went back to this one and reworked it...
Results! Series 2 Iteration 1


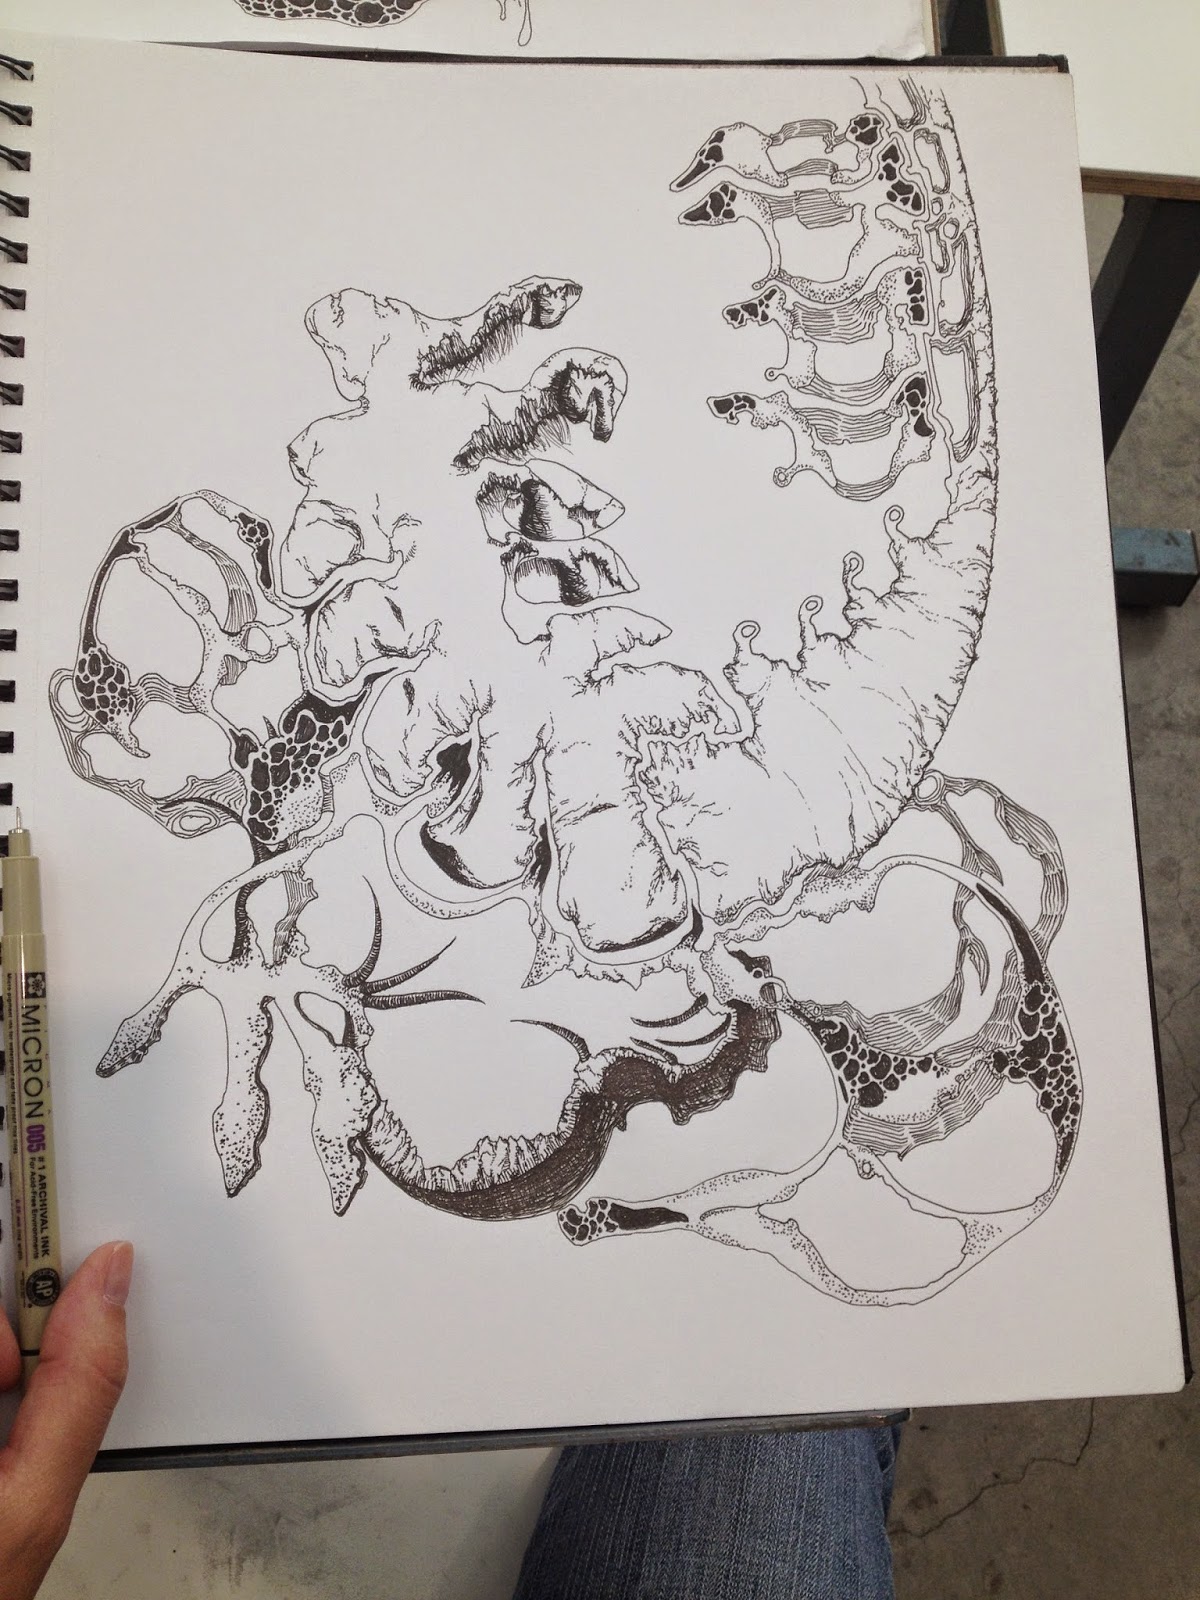
The final iteration in this series is, by far, my favorite to date. I explored depth and texture and line.. all of which were different from previous iterations. I directly referenced bone marrow and the structures within bones and joints. As stated in previous posts, I basically let my reference images guide the direction my drawings take - this process led me to the following results...


Finished! Series 2 iteration 4
One pattern I have noticed while working on these is.. the entire process is emotionally and mentally exhausting. I spend several hours working on each drawing, examining and reexamining x-rays and texture studies. Listening to the music that was playing in my life during these events and announcements. I find that I can only create a few iterations per series because eventually I grow tired of the repetition of forms and creating cohesion between different iterations in each series. 


detail view
Most iterations have one or two commonalities in textures or forms, but generally they are all completely independent of each other in design and layout. I found myself creating more horizontal compositions with this second series, probably because of the suggestion of the pelvic region, hips, leg bones.. they demand more space. They literally hold the body up and keep us moving... which brings us to the next series.

detail view
As stated in the previous post, the following series is about my mom and dad and their various health issues and struggles from the past few years. My dad had surgery on his spine earlier this year and is recovering, happy and healthy, but holy MAN were the x-rays insane! He has huge screws in his spine, growth plates, fused bone tissue.. it's crazy. He had to wear a brace and has had all sorts of physical therapy since the initial surgery. Not to be morbid or weird.. but I was really excited to receive these images and work with them. There are so many different types of bone structures in the head, the face, the neck, etc. I was able to see the inner structures of the vertebrae as captured by the x-ray, which is super cool. There is a dense latticework of marrow that shows up in each image.


In addition to the images my dad sent, my mom sent me her images as well. She had bursitis and has had several issues with that diagnosis. I won't go into specifics, but bursitis makes it really hard to walk and limits your mobility.. Again, more things that happened while I was away at school! I have been struggling to feel connected to my family since I moved up here and when these hospital visits/procedures happen, I am kept in the loop through group messages and emails. My response to this communication? Drawing. I will be honest, I have struggled with this series so far. The events were fairly recent and the memories clear, but it's still scary to think about how many 'what ifs' were at play during each parent's procedures and treatments. As someone who has a bit (A BIT) of a control complex, I did not enjoy the not-knowing, the waiting for updates, the random texts about physical therapy or injections or whatever came to pass. In response, this series will be more directly representational of the family unit as a whole. I will explain..


Series 3 Iteration 1
This first iteration was abandoned in favor of the following drawings but I have since come back to it. The main object is featured in several pieces. The form on the left and the zig zag-type shape are meant to represent my dad. They somewhat resemble a spine and a jawline. My dad was struggling with arm and neck pain with his condition and I remember seeing him very tense in the face, fighting the pain. After viewing the x-rays, I saw the full scope of the problem and expanded my focus to the head as well as the spine and vertebrae. The other forms in the drawing represent myself, my sister, and my mom. The form at the bottom of the image represents my mom, the one to the right of that, myself. The form at the top represents my sister. I wanted to illustrate the connections we all had to my dad throughout this process. I came home from school/work to be there for surgery and recovery for my dad. I was told by a friend that the objects kind of look like satellites, circling around the greater forms..

detail view
 The second iteration in this series took on a more direct representational approach to the images I was seeing. I referenced the spine and its structures with very little abstraction but continued to explore the idea of 'satellite' forms or bodies in the composition. 


Series 3 Iteration 2

interaction of forms - detail view
beginnings of deconstruction


Working on this iteration presented interesting challenges that I will apply to the previous drawing. I wanted to make sure the satellite bodies appeared different from the main structure. I used differing structures and textures to create discontinuity in form and shape between the two ideas. I also wanted to echo the experiences my mom was having with her own condition so when drawing the satellite forms I created similar spaces in the bones as the ones found in the pelvis, the joints, and the various arterial structures found throughout all three. I maintained the abstraction aesthetic I wanted in my series as a whole, but there were definite skeletal forms in this iteration. The best part about this drawing? TURNING IT UPSIDE DOWN.


 See?! It completely changed... therein lies the power of perception and how we choose to view what is in front of us. I will create two more iterations in this series and then I am moving on to a series about my aunt and finally.. one about myself. That one will be the biggest challenge.. I'm not ready yet. Working my way up to it, literally.


The next step in this process takes WAY less patience because I am going digital! I decided to try and scan in my drawings for printing. Large. Scale. Prints. My dad sent me some rolls of HUGE canvas to print on. Because.. of all things.. the Design Lab on campus also has a 44 inch HP photo printer. NO KIDDING. So my first step was to scan in the drawings I wanted to work with.. and then..


 I had to set up the printer on my computer. Thankfully my dad is the graphic design/printing guru of the family so a quick couple of calls later, I was ready to go!

photo for scale - this thing is HUGE
I first printed onto regular inkjet photo paper, to see the level of detail I had reached through my scans... um. 400DPI did the trick nicely!

this print took about 25 minutes - so pretty!


 AGAIN, pictures for scale - this paper, these prints, they are huge. And I love that. Now I can see all the tiny details, the little drops of ink on the paper, the mistakes, the successes.. it's a hugely important process for me to examine my work closely. AND it forces the viewer to become part of what they are seeing; it transports them into the drawings and the environment created by each series. I am in love with this printer, and I don't care how weird that is.

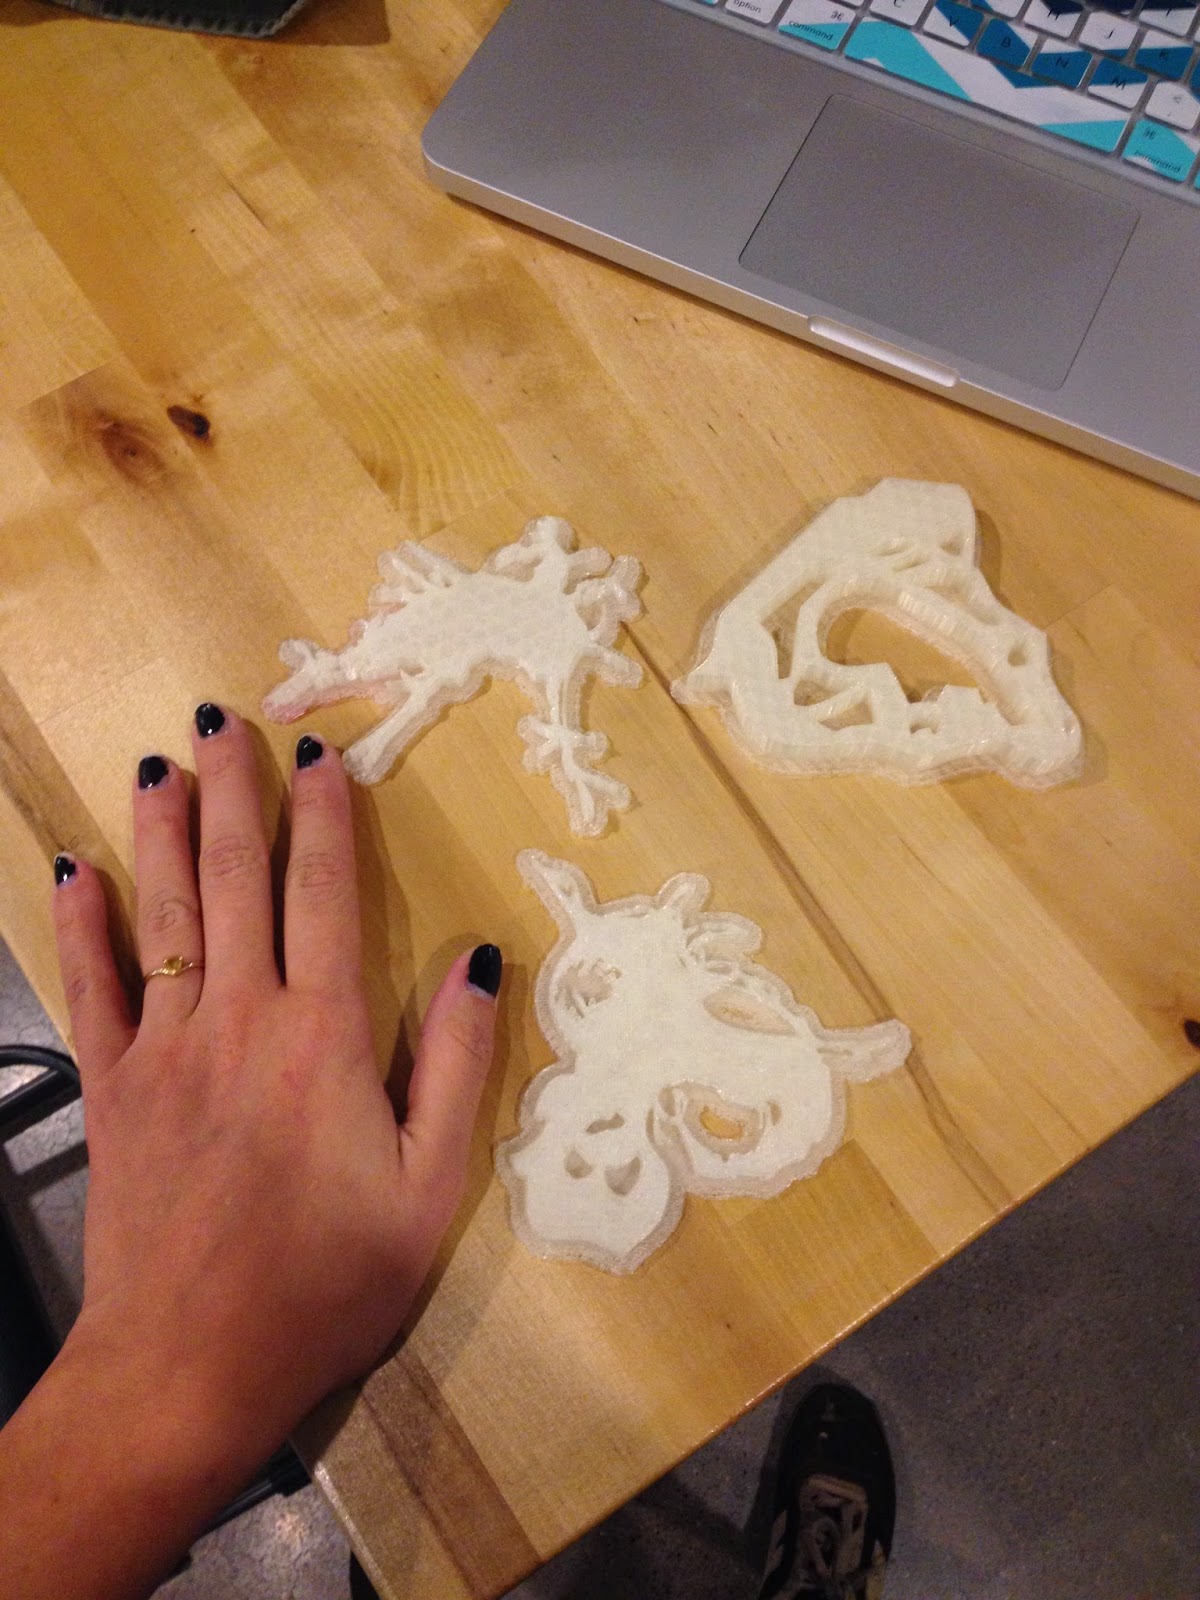
In the midst of all the printing party going on.. I also decided to try and 3D print a portion of one of my drawings. I had uploaded an image into TinkerCAD, which has an option for 2D images being placed onto a base. Worth a try, right? I will be returning to the lab today to finish the print.


SO MANY things happening. Speaking of the lab! We are having the grand opening today at 3! The Digital Design Lab is finally complete - mostly - with Mac desktops, laptops, Xbox Kinect, four Makerbots, one Digitizer, sewing machines for wearables, soldering supplies and equipment, Raspberry Pi programming software and hardware, SCRATCH, Minecraft, GoPros... you name it, it's there! And it is available to future teachers to experiment and tinker with. I have been going each week (obviously, that's where my blog posts come from) to experiment with 3D printing and now with large format archival prints. No big deal. I'm just a huge teacher/learning nerd. I love it to pieces and today we get to celebrate the strides we have made as teacher-makers and tinkerers.

And I get to wear this sweet shirt!
 My professor asked if I would be in charge of the 3D printer corner - aka talk to visitors, faculty, and students about the learning potentials through 3D printing in the classroom. Super useful considering my presentation at the MAEA conference is in a month! I will also share with visitors my personal experiments with the technology and how I have utilized it to explore art and sculpture from drawings. It's going to be an awesome time and I get to promote my work too! Can't beat that :)

The large canvas prints were 43 inches wide and more than 50 inches long. THEY ARE BIGGER THAN THE WORK TABLES. I need to figure out some way to display them so they 
a. stay flattened for viewing
b. hang from the wall? 
c. stretch onto bars for display??

I am trying to figure out how I will show these large pieces.. they're too big for me to hold by myself! 


The smaller, thicker canvas print was around 18 inches wide and close to 30 inches long. I will definitely be playing with layout, layering of drawings, and sizing for these print experiments. In the meantime.. I have plans to cut up one of the large canvas prints and make it into something for class. It's always homework time.. always..

Seriously awesome prints on this canvas. Love it.

another huge print on the thinner, larger canvas 
Until the next post... I must go eat my lunch or I will be too too too cranky to function.

Ms. Kanak

Wednesday, September 24, 2014

WOW Wednesday: Troubleshooting... in 3D

Well Hello! Another Wednesday is upon us and with that I bring you something that WOWed me last week - 3D printing goof ups.

So this semester has been a big old pile of MADNESS. Productivity, efficiency, creativity, and successful madness, at least. Last week I received an email that enclosed the MAEA conference workshop schedules and I was SO excited to see my name on there :)

It's official. I am a workshop presenter. Bow down.
But that got me thinking.. HOLY CRAP I ONLY HAVE A FEW MONTHS TO PREPARE FOR THAT?! Panic.. subsided, eventually, and I made an appointment to print in the Design Lab on campus. I downloaded a pre-made model set of, of all things, Pokemon! The files had a set of different 'starter' Pokemon from the original 151. Yes, I am a nerd.

Charmander!
I also thought Pokemon would be a good choice to print because kids will be familiar with them and it's relevant to their interests. All about relevance. And Charmander is cool. ANYWAY.

I also finally finished my Rocket Whale model that I was building on Tinkercad! Last time I was printing the website crashed and I had to start over again.. talk about frustrating.
Rocket Whale side view

Rocket Whale top view
As with all new technologies, troubleshooting nearly ALWAYS comes into play. This particular issue was completely human error.. aka me being careless and not paying attention. Bad. I wanted to print my whale in royal blue PLA filament and that would have been fine.. if the spool was attached to the right machine! I attempted to attach the filament spool to the new Makerbot 5th Gen, completely disregarding the fact that it didn't.. exactly.. fit on the machine. It was a spool made for an earlier model and so was larger and too tall for the printer. Uhhh...duh.. and so began the long saga of the Robot Whale print!
the fruits of my labors.. ick

Attempt 1: I THOUGHT I had everything set to go! Filament loaded, extruder heated, printer plugged in... yeah, no. I was working on printing multiple models at once so I arranged two different sized whales next to each other. However, I completely forgot to move the models to the print bed. Which basically meant the Makerbot thought my models were floating in space above the print bed. This lead to two separate whale bases (on left) that kind of.. ended up being a pile of squiggles. So. I immediately aborted the print and cleared the print area. We press on and start again!

Attempt 2: MOVED my whales to the print bed. Made sure they were sitting level and nice and pretty on the screen, right? Riiight? Okay, well. Again, human error intervened. I had loaded the larger spool onto the printer and about 3 minutes into the second attempt the spool FELL OFF the printer onto the prints, narrowly missing the extruder and I had to play damage control on the spot! Stupid mistakes lead to bigger problems than necessary when you don't correct them because of stubbornness; lesson LEARNED. I am lucky the printer wasn't damaged - just my pride. On to the next attempt...

Attempt 3: Now, I'm not a superstitious person, but 3 is my lucky number. And I had FINALLY grasped the error of my ways. I gave up the blue PLA and switched to a properly sized filament for the Makerbot, reset the printer, and got to work checking everything out. One important step I could not miss.. turning on rafts and supports. This step would have probably helped the printer communicate more effectively in the first attempt..but probably not. I have learned to ALWAYS either move the print to the bed or rotate it in a way that it lays flat on the bed.. because if not it will be a messy squiggle party. But I digress..

Rafts and supports ON
behold.. the raft

Rafts are used as a foundation for the model to be built on top of. They are often printed in the opposite direction of the rest of your print, or in a very simple pattern that differs from the final print. This allows the print to be attached to the print bed and also allows for easy detachment from the rest of your model. Think of it like a plate- the plate holds the food and also acts as a base that the food can be removed from. I will be the master of analogies by the end of this post haha

I exported my print file to the printer and then.. finally.. success. The print was estimated to take 2 hours and 40 minutes but in the end it took closer to 3 hours. No filament problems, no other hold-ups.. just straight printing!
With rafts and supports turned on the print would take much longer but would also be much more structurally sound. Supports are little structures that resemble scaffoldings that hold up certain parts of the print internally and hold external pieces on to the model.


Rocket whales in progress..
I double and triple-checked the models throughout the process. The timing was perfect; I could work on my other homework while the print clicked away and took shape. As I watched the supports fall into place I realized that the model was going to be FILLED with material. During modeling I made sure that the models were hollowed out in the middle which optimizes print time and efficiency.


I timed the Charmander prints perfectly with the rocket whales and they were complete in less than 3 hours.. go figure! You can plan everything out and it can all go differently when you're not looking.. This model was  pre-made by a designer and the only problem I encountered was with the filament! AGAIN! I admit.. my stubbornness got the best of me on these prints. I once again put a spool that was too large into the printer and thaaaat came back to bite me! The filament was a bit tangled on the spool and I wasn't paying attention so at one point the filament stopped going through the extruder. This created a gap in the rows being printed. Two or three layers were not printed because the filament was not tensioned properly, and luckily the spool didn't fall out again! But I basically had to unravel the filament (since I couldn't untangle it during printing) to reduce tension and resume printing.

75% complete!
Check out that Charmander!
By the time the prints were at 75% completion it was also time to leave for the day. I paused the prints and left the files in the lab to print the next day. Luckily, my professor was coming back the next day and finished off the printing process. Then it was my job to clean up the prints and remove them from the print bed. The Charmanders detached easily from their rafts; whomever designed them did a really good job of printing in the opposite orientation for quick removal. The Rocket Whales, however, were another animal entirely. 

choose your weapon

I had to remove the whales from the rafts with... a multitude of tools. The first tool I usually use to remove objects from the printer is a paint scraper. After that initial removal I then I had to use pliers, tin snips, needle nose pliers... lots and lots of tools to remove the tiny supports and remnants of the rafts. This took forEVER. I spent nearly an hour scraping and pulling off PLA from the bottom and sides of the whales. In addition to that, the whales were no longer hollow; they were filled with supports. If I had enough time I would probably go back to the model and go through to clear out the supports and keep the hollow quality. One model problem I discovered was that the 'egg' shape I used to hollow out the whales had collided with the outer 'wall' and created a bit of a fault at the front of the whales. Not a major issue, but if I had been more careful with my modeling I could have prevented that design flaw. Again, learning from the mistakes.. that's what it's all about :)

All in all, I was very pleased with the quality of the models.. and now I have a couple of little glow in the dark Rocket Whales to hang out with!

What I learned:


Uuum well, what didn't I learn?! I think 3D Printing is a hugely useful tool in terms of learning by design, failure, correcting mistakes, prototyping.. I had to make many, many changes before I had a successful result with my own print design. Many of the changes I made were to prevent further errors in the process, not in the design. TinkerCad was immensely helpful in troubleshooting the models before printing but at a certain point I admit I became kind of lazy. I should have checked the wall thicknesses before adding a hollowed out hole form. Other than that, the models were structurally sound, solid, they sat 'flat' on the table, and were just plain cute!

It was fun to go all the way from planning, to constructing, to modeling, and then finally to printing and see the final results. I will be creating more objects in TinkerCad to experiment with in the lab and continue to post my findings and reflections. I have found it immensely helpful to write about each experience - and now I will have my writings to fall back on in my presentation as well! The end goal is to demonstrate the entire process through images and I hope to print samples for each attendee of the workshop at the conference... gotta figure out what their 'take-home' print will be.

On that note, I finally have a break for a bit between classes so I am going to RELAX.

Next post will feature a 303 progress report and lots of new ideas.
Time for some lunch.. My life revolves around food.

Ms. Kanak