Week 6... WEEK 6?! Already. Oh man....The week after homecoming is always interesting.. students come back more tired than the last time you saw them, they’re scrambling to complete work they may have forgotten, and most of them just want to talk and talk AND TALK about homecoming festivities. All fine and good. It’s nice to see so much school spirit flying around – literally! So much toilet paper and streamers. Bringing students back into crack-down-and-work mode can be a challenge, though. Monday was no exception. My advanced handbuilding students were working on their new projects, twisted vessels. The advanced painters were starting their new drawings and sketches, which were vastly different than their first projects...


I document their work as they progress on my phone and have been compiling the images into files. My idea is to provide them with a thumbnail sheet of the photos I have taken to show the process they undertook to complete their paintings. My ceramics students are a bit harder to document – they work in small doses and finish their projects quickly. It’s kind of amazing how their work comes together with such care and detail – clay is definitely not my strength. It’s cool to watch them work through problems and plan their art.
At the elementary school it was time for another round of Brain Machines! I am sorry I did not capture any pictures of this class’ work but to be completely honest.. it was chaotic. This half, or team, of 3rd graders has a handful of students with special needs. One of the students came with an aide today, because he refused to let her leave his side (not a good start). However, she volunteered to help us with the craziness involved in the brain machines project! We had the two lamps set up on the cork wall with paper tacked up, ready for tracing. Unfortunately, one of the lamps I grabbed was not tensioned correctly, so Mr. Keller had to get help from the special education aide to hold the lamp in place and direct kids. When I do this lesson in my own classroom I am going to have to really nail down the details and how-to of the project so I can do it myself. I think I would probably just have one lamp set up and that would pace the lesson well enough that students would have time to cut out the silhouettes and glue them by the end of the period. In the end, it all worked out well enough. Students had some fun ideas and enjoyed working on the project. They listened well and followed directions as well as 3rd graders can :P.


I also motivated them through showing off
some of the 7th graders’ drawings. The 9th graders have
more space to draw on so the expectations are higher! They wanted to start
right away… right after they finished their black and white hand drawings. My
introduction to the new assignment was at the end of class, which was not
really my ideal timing, but you take what you can get. The students were
interested in the new project and started gathering images, writing down their
interest inventories, and some of them drew a little bit as well.


They have received lots of nice comments and ‘oohs and ahhs’. On Monday I took the entire class down to the library to see their work but in a small school like that you quickly learn how rooms become repurposed. They were holding driver’s education in the library during our class – of couuuurse. My solution? Send two SILENT 7th graders into the library at a time to view the work. They were better behaved than the driver’s ed kids! And it was fun to see their pride in their work as they pointed it out to their classmates and friends. I had them fill out rubrics for their projects that day and there were very few students that did not score themselves highly on the finished product. Some of them are SO CRITICAL of their technique and skill – they would constantly question the process, the quality of their artwork, why they were even doing it. But they all stuck with the project and did some awesome work that was put on display for the whole school to see and share :)

After rubrics were done students went back to work on
their Dia de los Muertos drawings, which were coming along really nicely! I
encouraged the students to sway away from using logos – something I did not
foresee in this project. It was interesting to observe how many students
associated logos or brands with their self portraits..more on this later.
Students had the rest of the day to work on their drawings and transfer to
their print plates.


The 7th graders had a full work day today.
Lots of them were getting to the point with their print plates that they were
ready to move on to actually printing them! This is the challenge I have with
this particular group – differentiating and timing. As I have said before there
are a handful of students in my class that work so so SO incredibly fast I have
to find more projects for them to work on, or extend what I already have
planned. So, I improvised, and had them create second print plates of whatever
they wanted – the two boys who work at lightning speed both made monsters. I
cannot wait to post the prints!


At both schools I know my weakness lies in the 'clean up'
time in the art room. I have set alarms to remind me when the students should
be picking up their work and cleaning up the art room, but I still have to work
on the organization of the actual clean up. Students are never late to their
next class, but I end up having to do the cleaning that they missed sometimes
because of my time management of that particular task. Since this lesson I made
big BIG changes to my clean up routines and expectations because Ms. Kanak
really does not have time to be picking up after littles every day! And that
goes for all of my students and classes…phew.
I had a break in the madness for one period and then it
was time to bring in the crazy – crazy 4th graders! We were finally
set to finish up their Zones collages and they did a really great job with
adding details, creating 3D features, and sharing ideas with their classmates.
It was fun to listen to their spoken creative processing and comments on other
students’ work. “Whoa! COOL nose!” “How did you make the hair look like that?”
“I am making a green zone face, too!”


For me, it is more important to have
students interacting and learning from each other than it is to have a
completely quiet work space. And this group especially needs to have the outlet
of chatting among themselves to be productive. I just reinforced that their
voice levels needed to stay at a dull roar so we could listen to music and get
our work done. No problems there! They finished their Zones faces and we lined
them up on the back table to look at and talk about. They decided which ones
were the most convincing, which ones were the silliest, the happiest, the
saddest – they were really connecting their Zones knowledge with their artwork.
I was proud of them and reminded them to keep their eyes out for the artwork in
the hallway! Mr. Keller and I planned to collage the faces on the wall outside
of the classroom in correspondence to the Zones of Regulation all teachers are
emphasizing in their social-emotional time in the classroom.


 |
| The Zones faces collaged in the hallway :) |
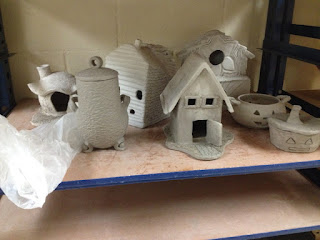
Wednesday was our block day with double the ceramics and
double the Art Survey 7th graders. It was also a fun day for the
advanced ceramics students because they were setting up work for firing! Bird
houses and a cute wheel-thrown pumpkin dish.. I have to make a note to document
more of the wheel-thrown work – it’s really nice.


Script: “Add a small amount of block printing ink to the
tray. Use the brayer to spread an even layer of ink and to take care of any air
bubbles in the ink. Apply ink to the front of your plate (the carved side)
evenly and carefully with the brayer. Holding your plate by the edges, turn
your plate over and line up your stencil with the registration marks on your
paper. Use the baren to firmly press down your plate onto your print paper.
Remove your plate from the paper CAREFULLY and hang to dry. Repeat process (you
need 5 prints total!)”


Students were eager to start printing and set up right
where I left off! A couple of the students completed their prints fairly
quickly and worked on their second plates (SEE What I mean by differentiation?!
They work like crazy fast!). Little did they know that I was watching ever so
closely and surveying the quality of their prints… more on that later.


One of the really fun things about our block days is STAT
time. STAT is the high school students’ study hall hour that they have before
or after lunch. If they accomplish all their work for the day, a big group of
our art students will come in and work during their STAT period on their
projects. Whoever thinks there is no correlation between high academic achievement
and involvement of the arts NEEDS to come to our STAT hour and see what these
kids are cranking out. It’s impressive and I am loving watching everything come
together and evolve closer to mastery of skills.
At the elementary school I had some time to prep for my
new 4th grade lesson, Island Maps.


This group of 4th graders was a little bit
more calm than the other one, but still with some quirks. I feel like this
round of introducing the lesson went much more smoothly than the first one –
again, it’s a huge advantage to have that second chance to teach the same lesson.
I try to reflect honestly on the strengths and weaknesses of my approach and I
usually come out of that self-talk with good results and improvements. The
primary objectives of this lesson for the day were for students to learn some
geographical features, create and draw an imaginary island map, and create
identifying symbols for different geographical features. I put up a map of the
United States and had students circle places they had been and explain the
geographical features in that place. We had a work bank to choose from and I
tried to provide examples for each word. This time I did most of the circling
and talking and we got to work on our maps much faster.


Thursday was a work day for all parties involved. I had a
block period with the drawing students. I like working with this group – there
are a lot of different personalities and most of them are really diligent
workers. Most. Of. Them. Some of them would be content to talk and do nothing
all day in my class but uhh… yeah, that’s not allowed. I only had to redirect a
couple of times and what I really like about this class is I have a more
conversational teaching/lecture style with them. I walk around the room and
give suggestions to individuals or to the whole class, depending on what needs
to be clarified more. This class is also more willing to share ideas with each
other and work collaboratively. I could accomplish a lot with this group of
students if they wanted to do a cooperative piece of art… oh, the
possibilities.
At the elementary school I once again taught collage animals -
with some difficulty. Personalities are a huge part of classrooms and this
particular group of littles had a couple of very sassy ones. OH, and the best
part!? The teacher came to the door with, “We just had slushies. Sorry if
they’re a little sugared up!” A LITTLE SUGARED UP. REALLY. But more importantly WHERE
IS MY SLUSHIE?! Uhh yeah the littles were basically hopping creatures of
mischief and energy. Even my really well-behaved and usually calm littles were
off the wall wiggly. Soooo that made my job more interesting. I had them do
most of the talking and pointing out shapes in the animals so they could get
out of their chairs and move around a little bit. During the demonstration for
both groups I emphasized that we were all going to make different animals! So,
in a natural fashion, the littles ALL wanted to make seals like Ms. Kanak did.
No. No nono . No. I only had to redirect them to different animals half the
class period… two of the littles were really not having it. They wanted to make
seals. That was It. Another thing I have learned: choose your battles. If they
want to make a seal and are going to throw a sugar-induced temper tantrum to
get their way.. it’s best to let them make the darn sea mammal and move on with
your life. In the end, we all made beautiful rainbow colored animals from both
the zoo, the sea, and the farm, and we all got to go home and have a nap. Thank
goodness...
Thursday night I drove down to my parents’ house in
Illinois in preparation for the trip to Grand Rapids! I had to take down my
artwork and I wanted to spend some time wandering around in a new city. It
worked out really well because I had a seminar day that Friday so instead of
driving to Marquette I headed south and went on an excursion. The really great
thing that happened while I was en route was Mr. Keller sending me images of my
students hard at work in drawing and art survey J They were all drawing and tracing and
working away! Mr. Keller’s text read, “both classes, started working and kept
working the entire class period. It’s your excellent planning that made my day
go so smooth. Rest, relax and safe travels!” A welcome message to receive when
I was feeling a little bad for leaving to take care of my personal
responsibilities. But if I have learned one thing it’s that when you step back
and stop trying to control everything in your life… things tend to fall into
place the way they should.
And so we move ever faster into the next week of student teaching… man time
is flying by.
As always, thank you for reading. I hope you enjoy my
misadventures, adventures, and stories about the many many ups and downs of
teaching. I definitely enjoy living through and sharing them.
Ms. Kanak


