Wednesday, September 24, 2014

WOW Wednesday: Troubleshooting... in 3D

Well Hello! Another Wednesday is upon us and with that I bring you something that WOWed me last week - 3D printing goof ups.

So this semester has been a big old pile of MADNESS. Productivity, efficiency, creativity, and successful madness, at least. Last week I received an email that enclosed the MAEA conference workshop schedules and I was SO excited to see my name on there :)

It's official. I am a workshop presenter. Bow down.
But that got me thinking.. HOLY CRAP I ONLY HAVE A FEW MONTHS TO PREPARE FOR THAT?! Panic.. subsided, eventually, and I made an appointment to print in the Design Lab on campus. I downloaded a pre-made model set of, of all things, Pokemon! The files had a set of different 'starter' Pokemon from the original 151. Yes, I am a nerd.

Charmander!
I also thought Pokemon would be a good choice to print because kids will be familiar with them and it's relevant to their interests. All about relevance. And Charmander is cool. ANYWAY.

I also finally finished my Rocket Whale model that I was building on Tinkercad! Last time I was printing the website crashed and I had to start over again.. talk about frustrating.
Rocket Whale side view

Rocket Whale top view
As with all new technologies, troubleshooting nearly ALWAYS comes into play. This particular issue was completely human error.. aka me being careless and not paying attention. Bad. I wanted to print my whale in royal blue PLA filament and that would have been fine.. if the spool was attached to the right machine! I attempted to attach the filament spool to the new Makerbot 5th Gen, completely disregarding the fact that it didn't.. exactly.. fit on the machine. It was a spool made for an earlier model and so was larger and too tall for the printer. Uhhh...duh.. and so began the long saga of the Robot Whale print!
the fruits of my labors.. ick

Attempt 1: I THOUGHT I had everything set to go! Filament loaded, extruder heated, printer plugged in... yeah, no. I was working on printing multiple models at once so I arranged two different sized whales next to each other. However, I completely forgot to move the models to the print bed. Which basically meant the Makerbot thought my models were floating in space above the print bed. This lead to two separate whale bases (on left) that kind of.. ended up being a pile of squiggles. So. I immediately aborted the print and cleared the print area. We press on and start again!

Attempt 2: MOVED my whales to the print bed. Made sure they were sitting level and nice and pretty on the screen, right? Riiight? Okay, well. Again, human error intervened. I had loaded the larger spool onto the printer and about 3 minutes into the second attempt the spool FELL OFF the printer onto the prints, narrowly missing the extruder and I had to play damage control on the spot! Stupid mistakes lead to bigger problems than necessary when you don't correct them because of stubbornness; lesson LEARNED. I am lucky the printer wasn't damaged - just my pride. On to the next attempt...

Attempt 3: Now, I'm not a superstitious person, but 3 is my lucky number. And I had FINALLY grasped the error of my ways. I gave up the blue PLA and switched to a properly sized filament for the Makerbot, reset the printer, and got to work checking everything out. One important step I could not miss.. turning on rafts and supports. This step would have probably helped the printer communicate more effectively in the first attempt..but probably not. I have learned to ALWAYS either move the print to the bed or rotate it in a way that it lays flat on the bed.. because if not it will be a messy squiggle party. But I digress..

Rafts and supports ON
behold.. the raft

Rafts are used as a foundation for the model to be built on top of. They are often printed in the opposite direction of the rest of your print, or in a very simple pattern that differs from the final print. This allows the print to be attached to the print bed and also allows for easy detachment from the rest of your model. Think of it like a plate- the plate holds the food and also acts as a base that the food can be removed from. I will be the master of analogies by the end of this post haha

I exported my print file to the printer and then.. finally.. success. The print was estimated to take 2 hours and 40 minutes but in the end it took closer to 3 hours. No filament problems, no other hold-ups.. just straight printing!
With rafts and supports turned on the print would take much longer but would also be much more structurally sound. Supports are little structures that resemble scaffoldings that hold up certain parts of the print internally and hold external pieces on to the model.


Rocket whales in progress..
I double and triple-checked the models throughout the process. The timing was perfect; I could work on my other homework while the print clicked away and took shape. As I watched the supports fall into place I realized that the model was going to be FILLED with material. During modeling I made sure that the models were hollowed out in the middle which optimizes print time and efficiency.


I timed the Charmander prints perfectly with the rocket whales and they were complete in less than 3 hours.. go figure! You can plan everything out and it can all go differently when you're not looking.. This model was  pre-made by a designer and the only problem I encountered was with the filament! AGAIN! I admit.. my stubbornness got the best of me on these prints. I once again put a spool that was too large into the printer and thaaaat came back to bite me! The filament was a bit tangled on the spool and I wasn't paying attention so at one point the filament stopped going through the extruder. This created a gap in the rows being printed. Two or three layers were not printed because the filament was not tensioned properly, and luckily the spool didn't fall out again! But I basically had to unravel the filament (since I couldn't untangle it during printing) to reduce tension and resume printing.

75% complete!
Check out that Charmander!
By the time the prints were at 75% completion it was also time to leave for the day. I paused the prints and left the files in the lab to print the next day. Luckily, my professor was coming back the next day and finished off the printing process. Then it was my job to clean up the prints and remove them from the print bed. The Charmanders detached easily from their rafts; whomever designed them did a really good job of printing in the opposite orientation for quick removal. The Rocket Whales, however, were another animal entirely. 

choose your weapon

I had to remove the whales from the rafts with... a multitude of tools. The first tool I usually use to remove objects from the printer is a paint scraper. After that initial removal I then I had to use pliers, tin snips, needle nose pliers... lots and lots of tools to remove the tiny supports and remnants of the rafts. This took forEVER. I spent nearly an hour scraping and pulling off PLA from the bottom and sides of the whales. In addition to that, the whales were no longer hollow; they were filled with supports. If I had enough time I would probably go back to the model and go through to clear out the supports and keep the hollow quality. One model problem I discovered was that the 'egg' shape I used to hollow out the whales had collided with the outer 'wall' and created a bit of a fault at the front of the whales. Not a major issue, but if I had been more careful with my modeling I could have prevented that design flaw. Again, learning from the mistakes.. that's what it's all about :)

All in all, I was very pleased with the quality of the models.. and now I have a couple of little glow in the dark Rocket Whales to hang out with!

What I learned:


Uuum well, what didn't I learn?! I think 3D Printing is a hugely useful tool in terms of learning by design, failure, correcting mistakes, prototyping.. I had to make many, many changes before I had a successful result with my own print design. Many of the changes I made were to prevent further errors in the process, not in the design. TinkerCad was immensely helpful in troubleshooting the models before printing but at a certain point I admit I became kind of lazy. I should have checked the wall thicknesses before adding a hollowed out hole form. Other than that, the models were structurally sound, solid, they sat 'flat' on the table, and were just plain cute!

It was fun to go all the way from planning, to constructing, to modeling, and then finally to printing and see the final results. I will be creating more objects in TinkerCad to experiment with in the lab and continue to post my findings and reflections. I have found it immensely helpful to write about each experience - and now I will have my writings to fall back on in my presentation as well! The end goal is to demonstrate the entire process through images and I hope to print samples for each attendee of the workshop at the conference... gotta figure out what their 'take-home' print will be.

On that note, I finally have a break for a bit between classes so I am going to RELAX.

Next post will feature a 303 progress report and lots of new ideas.
Time for some lunch.. My life revolves around food.

Ms. Kanak


Thursday, September 18, 2014

An oldie but a goodie :) Why I am Ms. Dragon Teacher lady

So I apologize.. this week has been BEYOND insane in terms of keeping up with projects and assignments and I do not have any 'new' content to offer. However.. I wanted to repost this journal entry from a few years back - from when I was just a wee education student at NMU! This assignment was in response to a quote from the book Courage to Teach and I think I nailed it!

Journal #17: wherein Breanne transforms in to the baddest ass dragon teacher lady ever.
March 29, 2012 at 11:52pm

Palmer Ch. VI

“When I envision myself teaching at my best, I am most like a ______ ”(152).
Answer: Dragon

While this seems like a fantastical and bizarre metaphor to make, I see a lot of myself in it. Ever since I was little I admired and was fascinated by dragons and depictions of them in books and film. They had a grace that I did not find in other more realistic and real creatures. In my mind, dragons are creatures of loyalty, wisdom, grace, and controlled but significant darkness. They can be protectors or destroyers within seconds. They are unique and extraordinary imaginary things that have been found in so many cultures, their versatility and variety dwarfs some real species of animals. I imagine dragons as possessing the knowledge and great artworks of empires and kingdoms far before the present, and passing on this gift to others.
While they are powerful and masterful creatures, they also have weaknesses that are often fully exposed. I can reflect upon this in teaching; if we are vulnerable to our students, we can make meaningful connections and relate to our students. Dragons (hopefully humans as well) also learn from each experience, and become stronger and wiser. Thoughtful and protective, I could spread my wings across the top of my classroom and shield them from harm and discouragement. In a perfect world, I would be able to help students through all of their personal ails and issues, but we as teachers cannot interfere too greatly. Giving space and distance is important.
I envision myself teaching at my best as a watchful and wise protector over my students; providing guidance and knowledge to them while also being given respect and consideration for actions. Teaching high school/middle school students will also demand a thick hide (pun intended). In terms of teaching as an activity, I will want to give students their space to learn and grow independently as well as a group. Students of a certain age yearn for the freedom to create in their own ways and styles without interference, and I can and will respect that. Dragons command a certain behavior and are creatures of old, so possess great wisdom. However, they also are very adaptable and can acquire much new knowledge as time passes.
I suppose I am referring to a dragon like Smaug in the Hobbit by Tolkein. Smaug was a clever, old, wise creature that knew his strengths and weaknesses. The shadow side of the dragon would of course be a temper and impatience. While I recognize these are human qualities, a wise dragon can keep its emotions in check until a solution is reached, as well as be clever and cooperative. I do not consider myself to be an overly sensitive person, in teaching or in general, so a dragon seems to reflect upon those attributes.

So there you have it! Ms. Kanak is a dragon at heart and in the classroom. Now where can I get some food....

Ms. K

Sunday, September 14, 2014

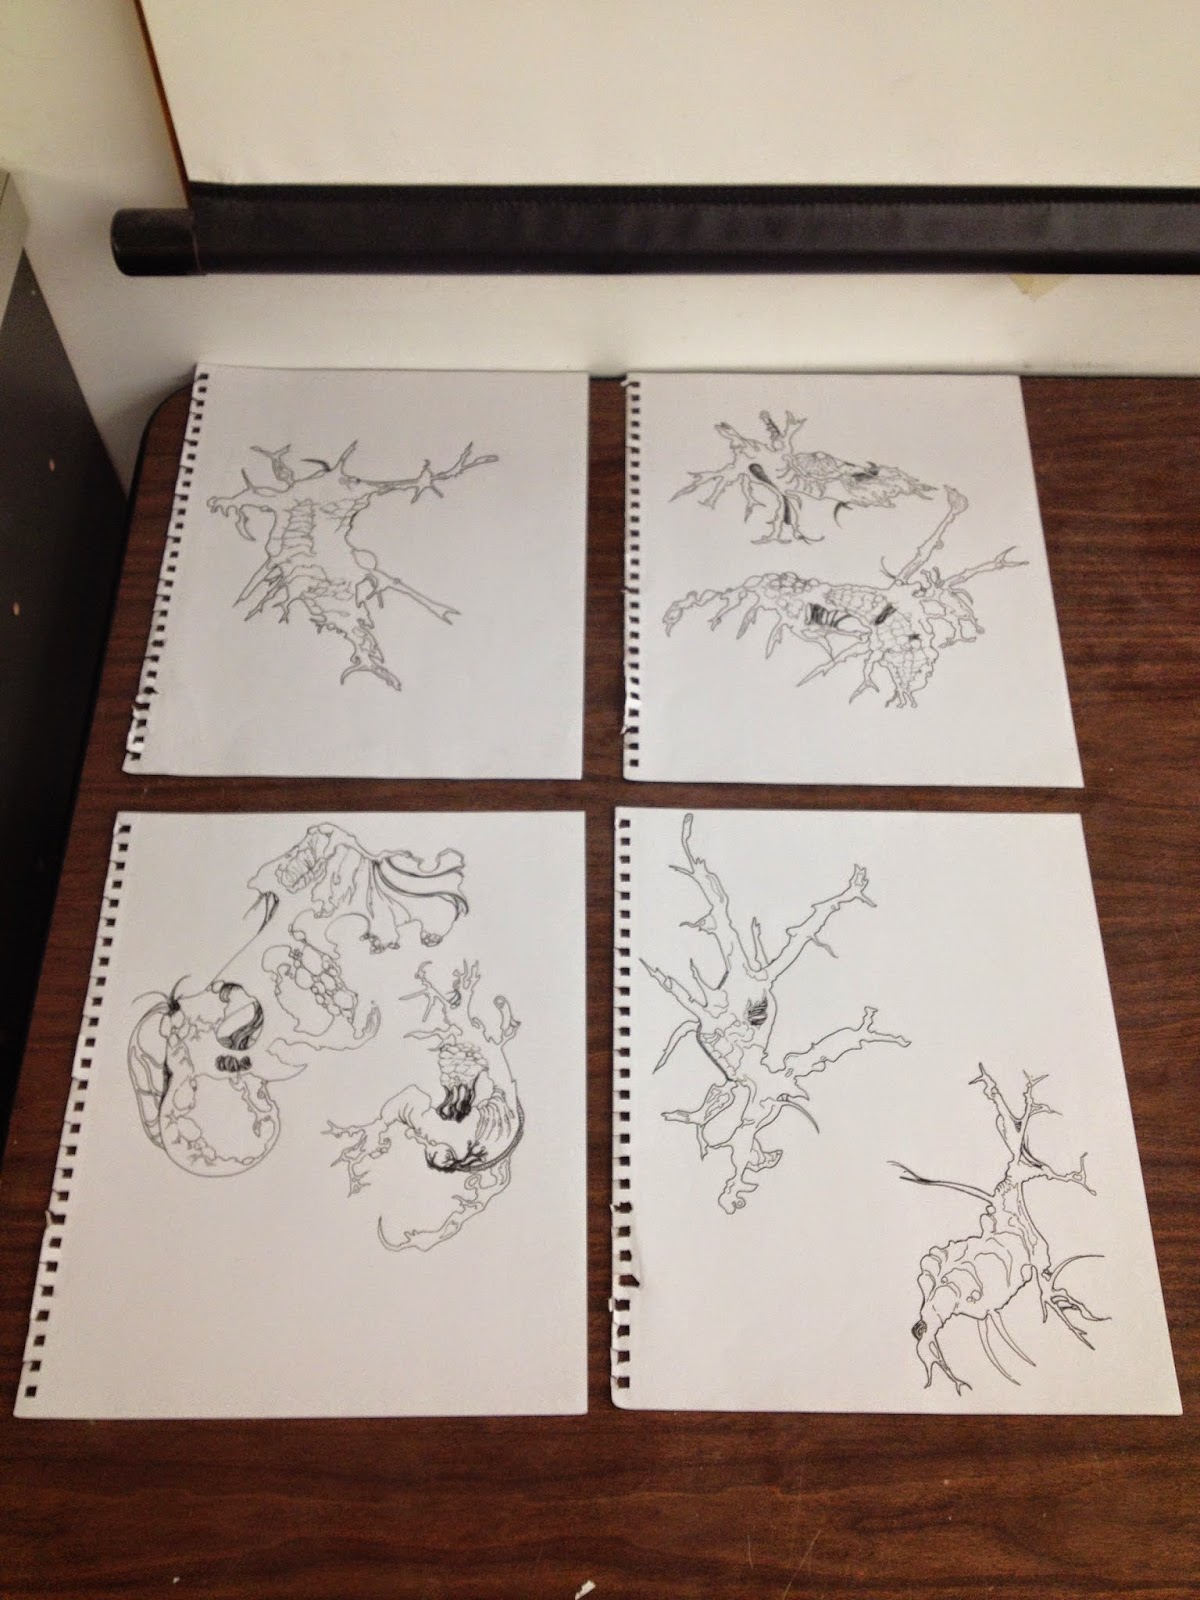
303 Individual Art Review: Progress in Process AKA the "Monsterpiece"


detail view 
Hey all!

Just stopping in for a "quick" update on my Individual Art Review series of work.. it's coming along way faster and more naturally than I anticipated. And to be honest, this update/reflection took the better half of two hours. 
In my previous post about my Individual Art Review (303) series, "Sometimes I just need to write...About my work", I indicated my desire to create a breadth of work about family and friends. Well.. my idea was approved a couple weeks ago and I have taken off running with it! I have made some pretty drastic changes to the original plans, but I feel that this series is taking off in a positive and transformative direction -- in more ways than one.

In order to create a series of healing and acceptance after months and years of denial and hurt, I needed to mask the true nature of the images so I could begin to view them differently as well. The process began with the gathering of artifacts and references, including X-rays, MRIs, surgical photography, and even medical journals which helped to fuel my research and interpretation of the events. My grandmother was the second relative to reach out and provide me with images from her experiences, preceded by another close relative whom I will discuss later :) She had suffered from a condition called Chronic Thromboembolic pulmonary hypertension... a mouthful, right?! To break this down, my grandmother was suffering from blood clots developing in the arteries in her lungs. She ended up having a pulmonary endarterectomy to remove the blood clots (serious surgery, guys). My grandmother (Gramma) and I are very close and I wanted to explore the experiences surrounding these events and condition with great care. 


The first of several drawings.. and the reference image: foot-long blood clots!
Through highly detailed drawings, I gained the power to perceive the information and images and reinvented them into new ideas and compositional arrangements. My drawings no longer represented medical findings and scans; they took on lives of their own, and began to evolve and change as I accessed more memories and artifacts. My grandmother and I had discussed the 'reimagining' of the images into more recognizable shapes or objects. She even contacted me recently to inform me she saw a 'dragon' or a 'flower' in some of the drawings. Already, I was seeing a pattern; the assignment of meaning by the viewer.. I was hooked.

I did not actually end up using this drawing in the series, but I used it for reference on other images..
In order to better access the memories surrounding these events, I play the music I had in my library at the time. It's amazing to think how tied to our senses our memories are.. my music player has the option of keeping track of dates when you added or listened to songs and I have found this an invaluable tool for recollection and connection. There were many events going on in my personal life at the time of these events as well, so it has also become a way to revisit and work through many other issues...I pretty much pick up the pen and go. I usually spend 4 hours or more working on one piece. It is important to me that I only work on one iteration at a time so I can fully experience the process and the impossible to guess results. I never erase and I rarely pick up the pen from the paper - it's almost like a trance, to be honest.

The image on the left was the second iteration of the reference image..
its pair came later.
I also took direction from the highly detailed etchings and observational drawings found in a copy of Gray's Anatomy. Muscles, bone marrow, fatty tissues, and even the 'structures' of organs inspired surreal landscapes and textures which appear throughout my series of drawings.

I seek to create ambiguity of figure ground relationships by using implied depth, abstraction, heavy distortion and textures. By changing the appearance of the x-ray or surgical photography, I in turn change the stigma presented with such cold and technical imagery. The power of the image is transferred to the viewer and they have the opportunity to assign meaning to what they are seeing - much like I was forced to do years ago when presented with the information.

One aspect of the works that my professors brought up was the natural human instinct to associate familiar imagery with that which they cannot explain. Aka personification and assigning meaning to the unknown. For example, the first iteration resembled a lobster or some kind of crustacean.. the original idea I presented in my first entries were about just that! Recreating images into 'real', and beautiful reconstructions. However, as I continue to work on these iterations, these imaginings and conceptions of ideas, I realize I cannot make them traditionally or outright 'beautiful'. Each image holds its own design aesthetic, patterns, structures, and characteristics that distinguish it from the others. Though they all operate in a series and present different views of the same idea, I cannot call them beautiful. And I do not think I want to, to be honest...

Fourth iteration

Third iteration of same idea... 

detail view
 As I worked on this first series, I brought in some unfamiliar images and textures into the mix. Working from a medical reference book inspired me greatly but I realized I was beginning to pull ideas and techniques from, of all things, childhood. When I was younger I would draw dragons for hours and days on end. Dragons and creatures with scales, bony plates, wings, claws- the whole package. While working I can often step back and see the influence of my previous objects of affection, dragons, in my lines and patterns. I can pick out the scaly texture from a dragon's hide or the delicate strands of hair from the mane of some other creature... they are becoming more complex and engaging than I could have hoped. No compositions or images I have pre-planned have ever been as detailed or concentrated as these series of images.

fifth iteration - seriously getting weird.
 The image above was actually a deconstruction of my first iteration. Again, I did not like that some people could 'see' objects or creatures in it so I decided it was time to chop up that one and try again. I am a huge advocate for learning from mistakes, and with this process I have to either accept the consequences of that line on that paper, or start completely over. I used a light table to trace in new shapes and orientations to the existing figure and repeated that process to create a pair. I wanted to create balance between the two figures in the composition and retain that feeling of 'the specimens' on the paper. Again, the textures poured out of the pen onto the paper and evolved before my very eyes into something even more strange and filled with life.

the completed first series
The first iterations of the first series were all very graphic and flat in nature. As I reworked them to completion, only then did they begin to have more overlapping and interacting structures... In my original drawings every object was without depth or suggestions of dimensions. They just were. After completing this first series I decided I needed many, many more. I had too many ideas and new techniques to depict and not enough space or paper!

I have begun work on the next series already (because I am a weirdo, yes) which use x-rays as a reference. I received the x-rays from my deceased grandfather's wife earlier this summer. She sent images of his knees, his kidneys, and his pelvis. My grandfather had prostate cancer and several illnesses that followed the initial cancer. He passed away a few years ago and my family has been recovering, slowly, ever since. They participate in several events centered around raising awareness about prostate cancer - most of which I cannot attend because, again, I live so far from their source. I have been made a spectator in the course of my own life and the lives of others - so this has been a coping mechanism of sorts. I feel very connected to the people in my life and I hope that this series can provide some level of solace in its own unique way.


first iteration
For this series I wanted to create images with a presence and depth to them. My original thought was to create landscape-like images, which would communicate the all-encompassing feelings that accompanied his passing. My family took the loss very hard and when I returned home for the wake it was like walking into an environment of sadness. In creating landscapes, I thought I would be able to transport the viewer to a different place to feel the confusion and chaos that I felt at the time... a literal landscape of emotion. While drawing, the objects began to close up into themselves and seemed to demand certain things. Now, before you write me off as the crazy artist lady, let me explain...


I started with one of the shapes I observed in an x-ray of my grandfather's knee and expanded upon that to create the first iteration. It felt very empty and loose, but there was also a rigidity to it I did not intend to depict.. It resembled the first series a bit too closely so I picked up a different image; this time a frontal x-ray of the pelvis. A random combination of that image and the image of the kidneys and the lower back began to take shape. I wanted to focus on veins, sinewy connections, holes, and of course structure in this iteration. The idea demanded certain directions be taken, certain paths be left unfinished. Textures began to form on the paper and I am not kidding when I say these things draw themselves. They really do.. I wanted to create depth and overlap, something I had previously not been concerned with in the least. Each piece has taken its own individual path, which is one of the biggest reasons I think I can do so many of them! I hope to create a breadth of work that spans across multiple events, each depicted through many iterations. 

second iteration - complete
 The third iteration in this series is arguably the most interesting so far. I mean, I think it's interesting because I'm drawing it, but seriously. I have not used most of these structures, patterns, or textures before. The works are creating languages of their own and I am merely responsible for putting them on paper in permanent ink. It's a very surreal process and it forces me to surrender control of the final results. ..something I have shuddered at many times before.

I began the third iteration late last night, using the frontal x-ray of the pelvis for a starting point. I wanted just a slight suggestion of that structure so I retained the basic shape of the pelvic bones and their orientation in the body. After that, though.. things went a different direction. Seems to be a common thread throughout this exploration of ideas! I picked up the x-ray of the pelvis again and began to take lines and shapes from the knee x-rays as well. Finally, I opened up Gray's Anatomy and referred back to their realistic observational studies and came up with...this.

third iteration
Some structures are found in the other series but the use of textures is all new and suggestive of pulsing, scaly, porous surfaces. It. Freaks. Me. Out. In a good way, I think. After working the image a bit more, I reached a stopping point and gave myself a break. Looking down at the progress so far.. I do not know which direction this series is going to take. I will probably rework the first iteration to make it more cohesive with the others.. but my goal is to create four images (or more, HAH) for each individual series.


 The next images I will utilize will be x-rays from my mom and dad's surgeries.. so many stories there, and relatively recent events so I have fresh eyes and memories to be inspired by.. I also received images from my aunt and her multiple x-rays and test results. That's a whole other saga to explore! In total, I hope to have a minimum of 12 iterations from various series.. I know I have more than that amount of images to choose from for inspiration and starting points!

So yeah... that's where I'm at. It's kind of a scary, crazy, unpredictable, and strange place to be... but so far I am enjoying the ride immensely. Every couple of days I sit down and just draw until I cannot sap any more inspiration from the images in front of me and then I start a new idea. It's so far from what I would call my 'comfort zone' of art - surrendering control to the media, to the process, and to the natural progression of making sense of strange images. I can't wait to see where the road turns next.


Until another big old lightning bolt of inspiration strikes,

Ms. Kanak

Friday, September 12, 2014

Shintaro Ohata Inspired Lessons

All Riiight! I haven't collapsed yet from exhaustion... this semester is going to be super insane all the time. I predict the future. Sometimes...

Anyway! I found a super cool contemporary artist who is getting me all kinds of excited about teaching, learning, painting, sculpting.. ALL of it. 


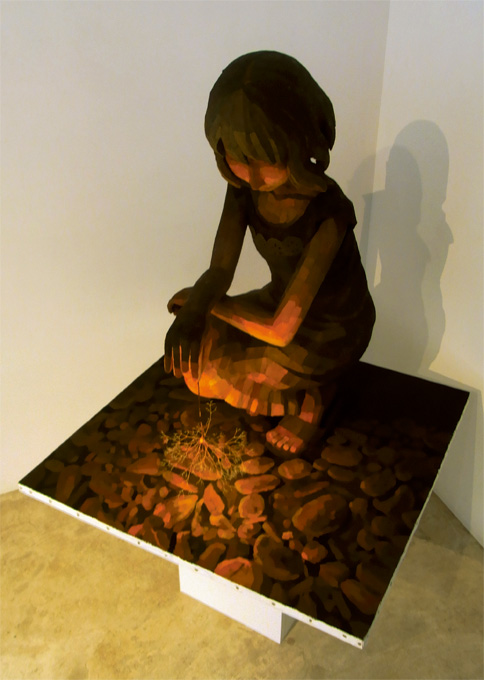
Shintaro Ohata is a Japanese painter/sculptor extraordinaire whose claim to fame is sculpted "3D" paintings. She creates sculptures of her subjects and places them in front of beautifully and dramatically lit paintings. The two elements together suggest story and personal dramas... she is a seriously cool artist.


When I first discovered her work I was transported back to a previous Art Education course wherein we discussed the working style of George Segal. Ohata's work is very similar to Segal's in that they both utilize the human form as a foreground 'object', so to speak. However, the figures interact with their environments differently. Ohata's characters seem to blend seamlessly into painted landscapes and scenes, where as Segal's figures more often than not appear a ghostly white (made so by the medical bandages used to cast molds) within their environment or suggested "post". I wanted to develop a middle school lesson about identity, place, and the juxtaposition or unity of the two ideas. This is how I party on weeknights.


Segal's work would be a good jumping off point for introducing Ohata's style - start simple and work your way up, right? I would present students with several questions, such as:

  • What is going on in this installation?
  • Why did Segal pose his figures in this way? (referring to specific works)
  • Why did he include ____ ?
  • Why did he exclude ____?
  • What is the message being communicated by the figure? The background/setting?
  • How does this work make you, personally, feel? Use descriptive language.
Opening a dialogue about identity, isolation, but also the need to fit in and belong in an environment.. there is so much potential for critical thinking and I want to get the kids thinking about the WHY. Segal was all about portraying the self in its mediocre and day-to-day glory. People waiting at the bus stop, people waiting in line to buy bread ("Depression Bread Line"), a lone figure rearranging letters on a film marquee - these people are ordinary. They are common; they could be your next door neighbor, your friend, your TEACHER. Segal masterfully captured the mundane lives of those who he casted. However, in doing so, he opens important psychological domains and expresses many feelings in implied movement, the individual faces of figures and their expressions, posture.. it's all up for discussion! Social and personal commentary abound, George Segal would be my go-to example to introduce this idea of A Place to Be. His plaster figures would also be part one of my lesson plan! Let's get to it...

A Place to Be

Objectives
  • View installations by contemporary artists (George Segal, Mark Jenkins, Shintaro Ohata)
  • Cast molds of classmates to be used in installation project
  • Teach students about the psychological expressions portrayed in the selected example works
  • Teach students basic digital photography and editing
  • Teach students transfer technique for final painting backgrounds
Key Concepts
  • Humans interact with their environments
  • Humans choose to ignore their environments
  • Humans all have differing levels of personal tolerance
  • Humans have an innate need for connection
  • Humans have a conflicting need for personal space
Essential Questions for Lesson
  • How do you interact with your environment? Do you pay attention to your surroundings? Do you try to blend in or stand out?
  • How can we communicate our feelings about our environments using posture, placement, proximity to the canvas? How can we capture emotion using color schemes and also a false human form?
Lesson Plan
A Place to Be
Mark Jenkins

Explore
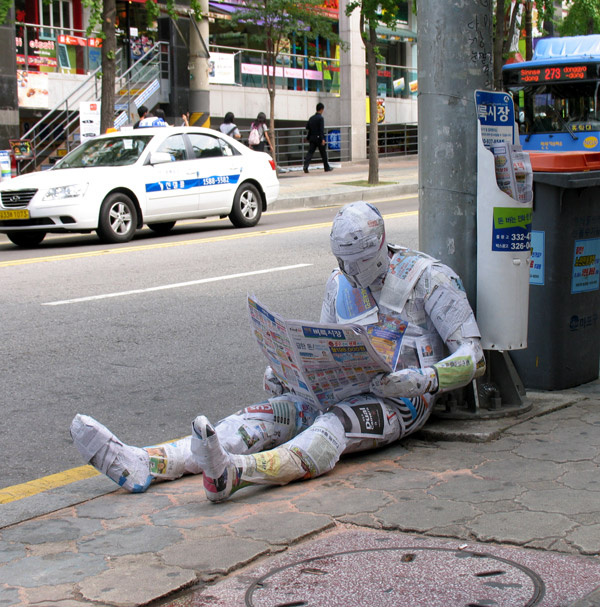
Take a walk. A long walk. Walk through the school hallways. Walk through your hometown. Walk through the city, the park, the bike path. Walk through a local store. Walk along a river or lake or stream or creek. Now take a moment to listen to the environment. Look around you. Draw what you see, write what you hear, write what you feel and how you interact in the environment. Make sure to note any suspicious or unexpected aspects of your environment. Mark Jenkins prides himself in the juxtaposition of unusual and sometimes downright creepy figures placed in otherwise ordinary environments. You are investigating your current place; make sure you observe and record carefully. You never know when you will encounter a faceless homeless person on the street, or a high-rise dweller. OR SOMEONE FACE DOWN IN FOOD. Just saying...it's all possible

Identity
How do you interact with your environment? Do you try to blend in? Do you try to stand out? Why do you think this is? Think of the way Segal portrayed 'urban alienation' in his sculptures.  Draw sketches of your classmates in dynamic poses. When it is your turn, try to choose a pose you would not normally take in your environment. Conversely, choose a pose that you might take if you felt uncomfortable or overjoyed. Explore the capacity for expression of emotion without your face - use your body to express your feelings. Good or bad, body language communicates to everyone without words. Segal sought to present contrasting colorful environments with his otherwise drab and ordinary human figures. Do you think he wanted them to stand out, or do you think he wanted us to focus on the environments?

**Throughout these explorations of theme and idea, discussion is PARAMOUNT. Keeping students thinking about the why, where, who is vital to their understanding and engagement. ALSO the more personal you can make your investigation into each 'mini-lesson' the more eager students will be to learn and take risks. There will probably be one or more students that do not feel safe and do not want to explore outside of their personal comfort zone. That is precisely why I presented the idea of walking through the hallways - school is a certified jungle in middle school years! Seriously, bring your good boots cause you're gonna trudge through some muck. There are certain places where certain students cannot or will not go. There are groups of people congregating everywhere, closing themselves off from interaction with other groups or inviting new members to their exclusive cliques. Isolation and uncomfortable feelings are a daily thing. It's middle school for craps sakes! It was not a fun time for most of us, and from what I have observed and learned from campers and students today, they don't think it's a picnic either. Schools are definitely diverse, scary, exciting, isolating, and inclusive environments. How students interact with their peers in school is often a solid indicator of personal identity. "I won't hang out with them because a. b. c." This assignment could break down some walls because guess what? It also requires partnered group work. Oh yeah. Bringing out the big brushes now... let me have some art puns.
sculpture workshop with Mark Jenkins
Belong
Students will be required to work in groups of 3 or more. This will ensure there are enough people to act as models and everyone will have the chance to work on some aspect of the piece. Planning will be essential to the success of the project - everyone needs to participate in the process of planning and drawing out compositions. Students are not limited to creating one model/cast but they should keep in mind time management and size. More models/casts will take more time and resources! Also, students should be mindful of the message they want to put across with their work. Again, we are looking at the psychological effects of posture, body language, placement.. what does the figure say about the environment, and vise versa?

Group Breakdown: class of 25-30 students
EVERYONE will participate in planning and drawing preliminary ideas. 
1 Photographer/editor
1 - 2 people can be models. More than that and they will run out of time!
at least 2 - 3 people 'bandaging' their models. Keeps up with time constrictions and many hands make light work of mummifying the classmates.. right?
After models are cast and dried, groups will need to start working on their backgrounds/settings.
Whole group needs to participate in the writing of the statement. Statements will be typed and handed in.

Create casts/models
HERE is where we get messy. The best kind of lessons are messy ones, I think.

  • Choose a position for your figure. Will it be a full figure or half a figure? Take pictures of the pose from all angles, draw draw Draw! And then it's time to get a little sticky..
  • Who is your model? Will you have more than one? PLAN for this process!
  • Cut plaster strips  - you will need a LOT
  • Apply vaseline to all exposed skin. Don't wear your Sunday best today - wear old clothes or bring plastic wrap to cover your clothes! If you are casting your hands and/or face, make sure to use LOTS of vaseline and plastic wrap to create a barrier. Plaster is not a fun substance to get stuck to your face.
  • Wet plaster strips and wrap them around body - one section at a time - until sections are covered evenly and completely
  • Let strips dry - hair dryers, anyone? Apply heat to dry out strips and set plaster.
  • Cut slits down the side of the body mold to remove sections. CAREFULLY.
  • Repair cuts with plaster or strips and allow to completely dry before painting.

Create Background
Students will be able to utilize digital photography as a tool for their investigations into environments and settings, but the final background image, or 'stage' so-to-speak, will need to be drawn and finally painted. Students should take photographs of their scene and the pose of their model(s) from multiple angles. I will allow students to project their images onto large paper to trace/transfer for their final work. Ideally, students would have large canvases to paint on but I think paper would do just as well - it would also be easier to display in the school. Students will be required to choose a color scheme for their scene - it can be harmonious or chaotic depending on the subject/idea presented. Discussions about the relationship between colors and moods can also be tied into psychological effects and science - it's all connected. 

Assemble
After drawings of the backgrounds/settings are completed, painting can begin. Groups will have to decide whom is responsible for painting the figure - that is really a two person job, but it will depend on the complexity of the scene, figure, design, etc. Placement of figure should be considered when painting - don't put your most detailed areas behind your figure! Bases for the sculptures should be made out of foam core or cardboard. Maybe using BIG boxes as environments could help with structural integrity and setting as well... it will be a project with LOTS of pre-planning required. Finding scrap materials for bases and backgrounds - Ms. K will have her own homework to do!

Retrace Your Steps
To reintroduce relevance to the final projects I would want students to photograph their work in the original setting they chose. ON THE OTHER HAND.. how cool would it be to put the final projects into completely different environments?! To create juxtaposition of place and setting... I get a little carried away with the possibilities sometimes. A photograph of the final project would be required for grading and then comes the written artist statement. Of course!

Critique
For critique, the final projects will be inspected in the classroom before being moved to their environments. I will need to check the structural integrity, construction, and execution of designs. Aka if it's falling apart, it's not going anywhere! Each student will review the work of their peers in their groups and fill out a response sheet posted by each project. Critique comments will be anonymous for individuals.

Reflect and Write
Students are required to write a statement about their work in the group. Students must indicate where the scene is set, what their intention was when choosing that environment, what mood they want to convey, and a title. Separately, each student will write about their successes, struggles, and thoughts on working in a team.

This lesson is something I REALLY want to try in the future. I might develop it, or deconstruct it, depending on grade level and time provided. Some other ideas would be to cut down the big idea into smaller sculptural elements, using tape instead of plaster bandages (to cut down on mess!), having kids just cast a hand or face.. I just love getting messy in the art room!

Back to the drawing board. Literally. I have to draw SO many things. My next post will be about my Individual Art Review progress - it's all happening so quickly...this semester is flying by!

Until next time,
Ms. K