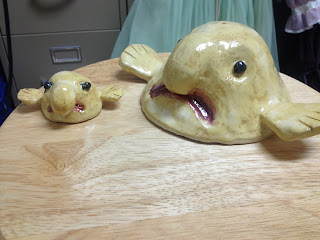
Wind Bells with Character
1. Description and Rationale:
“Sound connects us with our environment; nature is never silent and sound links us to other life.”
“400 B.C.: wind chimes were produced in Japan. The Japanese also practiced a form of Feng Shui that was related to the Shinto religion. In this case the bells and wind chimes were used to summon nature spirits as well as disperse negative energy from a premises.” Students will create an original bell form which they will then decorate using various handbuilding techniques. Students will create an animal-shaped bell out of clay.

b. Personal Connection
- “Sound connects us with our environment, nature is never silent and sound links us to other life. Sound stimulation can nurture behavioral changes and emotions. We can react negatively or positively to sound. Positive sound can ease the feeling of loneliness or isolation. Good sound can stimulate or enhance relaxation, reverse sadness, calm nervousness, tension and anger.
- Wind chimes help us to recognize Chi flow, by the sound the wind chime makes. The gentle sound of wind chimes can greatly help to create a positive energy flow and facilitate good Chi. They can also correct bad Chi flow by masking or covering negative, harsh or dulling sounds in the environment, such as the sound of traffic. Wind chimes can correct these situations and bring balance to a home and to your life.”
- Objectives:
General Objectives:
- Students will learn about Japanese Wind Bells and view images
- Students will listen to the sounds of Japanese Wind Bells
- Students will write and reflect upon personal experiences to inspire a high-quality ceramic piece.
Artistic and Technical Objectives:
- Students will view traditional and contemporary Japanese Wind Bells.
- Students will create a well-constructed, original clay bell animal using pinch pot construction.
- Students will learn how to properly slip and score their clay pieces to attach details or body parts onto their clay bell animals.
- Grade Level Content Expectations:
VA: Cr1.1.7a Apply methods to overcome creative blocks.
VA: Cr2.1.7a Demonstrate persistence in developing skills with various materials, methods, and approaches in creating works of art or design.
VA: Re8.1.7a Interpret art by analyzing artmaking approaches, the characteristics of form and structure, relevant contextual information, subject matter, and use of media to identify ideas and mood conveyed.

- Materials Needed:
- Clay
- Clay tools
- Canvas work mats
- Water buckets
- Brushes
- Kiln
- Glazes
- Teacher artifacts and samples
5. Supportive Instructional Activities
- Reflective writing about personal experiences.
- Discussion of presentation images
- Traditional and contemporary wind bell examples
- Short description of traditional uses of wind bells
- Teacher samples
- Showing students Ms. Kanak’s wind bell
- Sharing different types of bells
Process
- Discussion of images: traditional and contemporary bell designs
- Students write about what they think of when they hear the bell sounds
- Students will be able to handle bells – observe carefully and listen
- Sketches of animals
- Creating pinch pot shape for bell base
- Creating holes for strings and hanging
- Adding/subtracting clay to create animal as planned
- Creating clapper for bell

Drawing Process & Script [Breakdown]:
Brainstorming and drawing (Day 1/2).
Script: “Where do you think these bells are used? Why?
“400 B.C.: wind chimes were produced in Japan. The Japanese also practiced a form of Feng Shui that was related to the Shinto religion. In this case the bells and wind chimes were used to summon nature spirits as well as disperse negative energy from a premises.” What do you think of when you hear the bells? How do they make you feel? Do they remind you of anything/anyone?
Draw: start drawing animals that the bells remind you of – think about the movement of animals. How do they look? What sounds do they make? Draw draw DRAW. Your drawing will be the plan for your bell design!
Learning how to create the pinch pot (on canvas work mats) (day 2-3):
Script: “WEDGE YOUR CLAY. When you think you are done wedging, wedge some more! The amount of clay you need fits in the palm of your hand. Pinch pot process… “ Teach students to create a rounded bottom that is wider than the top. Hand tools, paddles, shaping techniques. Create holes for bell strings and clapper. Teach students to make a RELATED clapper for their bell. Example: If making a cat bell, make a mouse or a fish clapper. If making a horse bell, make an apple or horseshoe clapper..and so on.
Constructing Animal Forms (day 3-5):
Script: ”Animals have been made from clay for thousands of years. Whether to serve as idols for worship or decorations for the home, animals are welcome reminders of nature in our homes. You can make your bell into any animal you want – though I encourage you to think about the animals in your life. Do you have a favorite animal? A pet? An animal you relate to?”
Teach students to score and slip the parts of their animals onto the bell. Score and slip techniques, patterning, clay workability/changes.
Finishing touches – textures, patterns, carving, and adding (day 6-8):
Script: “What type of texture does your animal have on its body? Scaly? Smooth? Hairy? Pointy? Think about the feeling of your animal while you construct its body and add finishing touches. Details and construction are KEY. Make sure nothing is going to fall off or break!”

5. Clean up
6. Display of work before and after glazing
Glazing:
Script:
~~~
- Does the written reflection show what has been created in the product?
- Do the final images resemble student ideas?
- Did students participate in discussions?
- Were ideas well thought-out and executed well? Was effort shown?
- Did students understand the process and use of materials?


No comments:
Post a Comment